Editing FDMEE Reports

This blog entry is a quick introduction to editing reports in FDMEE. As an example I will walk through the steps to add the POV lock information to the existing FDMEE Process Monitor All Categories Report. You will notice that I am editing an existing report which is relatively straightforward. Creating a completely new report is more complicated.

BI Publisher

FDMEE Reports are edited with BI Publisher which is a free add-in for Microsoft Word. You can download it from here: BI Publisher downloads. You want Oracle BI Publisher Desktop. Once it is installed you will have an extra menu (‘BI Publisher’) in Word.

NOTE: you must select either 32-bit or 64-bit depending on your version of Word NOT operating system.

Overview

FDMEE Reports have two components: Query Definition (produces the data) and Report Definition (formats the data). We will need to change the Query Definition to include the database column that contains the POV lock information. And then we will add this new column to the Report Definition.

Query Definition

The Lock information is held in the intLockState column in the table TLOGPROCESS. We can get the SQL syntax from the SQL statement in the original FDM report:

(CASE
WHEN tLogProcess.intLockState IS NULL THEN 'OPEN'
WHEN tLogProcess.intLockState < 60 THEN 'OPEN'
ELSE 'LOCK' END) AS LockStatus

This is going to produce either OPEN or LOCK for each POV. To add this to the Query Definition in FDMEE, select the Setup tab then Reports | Query Definition. And then select the Process Monitor All Categories Query: R_QueryDef1

In the Select Clause box in the Details section below find the word FROM and put that on a new line by placing your cursor at the beginning and hitting enter. Add a comma to the end of tLogProcess.ProcessEndTime and then paste in the above code:R_QueryDef2

Click Save and then click Generate XML to create an XML file that contains the data produced by the Query Definition:

R_QueryDef3

Save the generated XML file. If you want to have a look at what is contained in this XML file, open it with Excel. Select ‘As an XML table’ if you are prompted. You should see the LockStatus column at the end. This XML file will be used by BI Publisher as a data source.

Report Definition

NOTE: I have not been on a BI Publisher course and I am by no means an expert. My knowledge comes from using many other similar reporting solutions and playing around with the software itself. If there is a better way of doing things please fell free to correct me.

Download the FDMEE Report template – Process Monitor All Category.rtf – and open it in Word. From the BI Publisher menu click ‘Sample XML’ and select the generated XML file:R_Word1

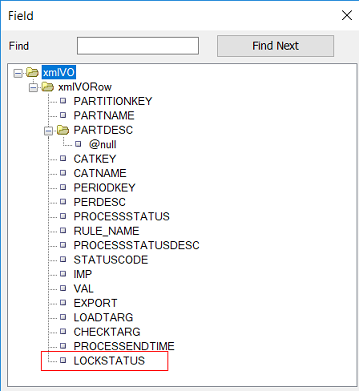
Click on the ‘Field’ button in the Insert tab to check that the XML has imported correctly. You will see the LockStatus field at the bottom:

R_Word2

We now want to add this field to the table to the right of the PARTNAME – RULE_NAME section. I have found the best way to do this is to add borders to the table so it is easy to work out where to click. Right-click on the white space to the right of PARTNAME – RULE_NAME and insert a column to the right. Click in this new column and then click the ‘Field’ button on the Insert section (see above) and select LOCKSTATUS.

R_Report

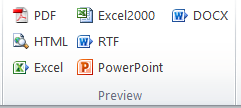
Now click on an output type in the Preview ribbon:

R_Preview

And you have the POV lock status displayed on the report:

R_Finished

NOTE: the data in the generated XML file is for all periods so there will probably be duplicate lines for the same location. When you run the report from FDMEE these duplicate lines will not be on the report.


FDMEE Global user

The Global user in FDMEE enables you to have a dimension member in the target that is written to by the FDMEE load process but is actually read-only for the user. FDM has the same functionality. This means that the user cannot change in the target the data they have loaded from FDM/FDMEE. It works well because you know you can prove that the data in the target is the same as that loaded into FDMEE/FDM. There is however a problem with this approach; there is no record of who has actually loaded the data, the logs in the target will contain the global user name not the FDM/FDMEE user. For some of my clients this is unacceptable as they have to show who has loaded the data and this information is lost.

NOTE: The example I will be going through is for an HFM target and I am sure something similar is possible for other targets.

Getting the logged on user

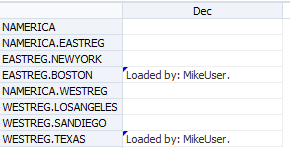
A simple and easy to implement fix for this problem is to write the logged on user to cell text in HFM. Before the export file is loaded into HFM (so use the event script AftExportToDat or BefLoad), read each line and save the entity (you only want to save the entity once). Then at the end of the export file add a !Descriptions section and add a cell text line per entity in the file.

Script steps:
Create a dictionary for the output
Open the export file for reading
For each line in the export file:
–  Save the line to the output dictionary
–  If this is the first data line save the year, period, scenario etc
–  Save the entity to a list if it’s not in the list
Close the export file
Save !Descriptions to the output dictionary
For each entity in the entity list:
–  Save a cell text line for each entity to the output dictionary using the saved year, period, scenario and for the selected account plus custom dimensions
Open the export file for writing
For each entry in the output dictionary:
–  Write the line to the file
Close the export file

In this example the selected account is PL111100 and the cell text label is [Default]:

Global-DatFile

In HFM you can display this on a form something like this:

Global-HFMForm

You now have a customisable log of who loaded the data from FDMEE.

FDMEE – Mapping based on the data amount

In my previous blog I talked about Lookup Dimensions and how they can be used to simplify mapping by storing information that is relevant to a small subset of accounts. In this blog I want to talk about how to use Lookup Dimensions to store calculated data. By ‘calculated’ I mean data that is not in the source such as the Target member as a Source. See Francisco’s excellent blog for an example here. I will be going through an example of how to use a Lookup Dimension so that you can easily map based on the data amount.

Mapping requirement

It is quite a common FDMEE requirement to want to map based on the data amount. For example if the value is positive it should go the debtor account and if it’s negative the creditor account. I have blogged about this before and all of the methods had a drawback of some sort. I think I have now come up with a really simple and effective method using Lookup Dimensions.

Before I go into the detail I want to lay down the ground rules:

  • Easy for the users to manage
  • The map must be contained in the Export All Dimensions to text file extract
  • No manipulating of the source labels
  • Editable in the workspace
  • Preferably not through Logic Accounts
  • Minimal scripting

Multi-Dim maps

Up until recently my preferred method was to use a Multi-Dim map and specify that the ‘dimension’ to check was AMOUNT so something like this:

#MULTIDIM ACCOUNT=[228*] AND AMOUNT >= 0

This works really well. The main drawback is that you can’t edit this through the workspace because it does not recognise AMOUNT as a dimension – the dimension selection box is blank. This means you have to manage the maps outside FDMEE. I have always strongly advised my clients to maintain their maps outside FDMEE anyway but it would be better if the maps could be edited either way.

Method overview

This new method involves creating a Lookup Dimension and updating it with text that identifies if the amount is positive or negative. First of all I will go through a high-level overview of the steps; the detail of how to do it follows:

  • Add a Lookup Dimension to the Target Application.
  • Add a Field against the Lookup Dimension on the Import Format. You specify any data – it doesn’t matter. If you don’t do this step you cannot use the Lookup Dimension in Multi-Dim maps.
  • Write an Event script to populate the Lookup Dimension with some appropriate text to identify whether the amount is positive or negative.

Add the Lookup Dimension

From the Setup tab select Register | Target Application. Then select the Target Application from the Target Application Summary area. Click Add and fill in the boxes. I have called my Lookup Dimension AmountSign and assigned it to UD9 (remember this – we will need it later):

LD2-TargetApplSetup

Update the Import Format

The Import Format will contain the new Lookup Dimension but it won’t have a Field assigned to it. I have assigned the Field Number 1 but it could be anything:

LD2-ImportFormat

Event Script

Now for the bit that does the actual work. Once the data has been imported, the Event script will execute a SQL command to update the value of the AmountSign Lookup Dimension dependent upon whether the data amount is positive or negative. Notice the script needs to reference the Data Table Column Name from earlier (UD9):

# Lookup Dimension
LOOKUP_DIM = 'UD9'
# Text for a Positive number
POSITIVE_NUMBER = '+'
# Text for a Negative number
NEGATIVE_NUMBER = '-'

# SQL to update the LookUp Dimension value
SQL_TEMPLATE = """UPDATE TDATASEG_T SET %s = '%s' WHERE LOADID = ? """
# AND clause for the positive amount.
SQL_AND = """AND AMOUNT > 0"""

# Put the load id into the parameter list
lstParams = [fdmContext["LOADID"]]

# First the Negative - set everything to negative.
SQL = SQL_TEMPLATE % (LOOKUP_DIM, NEGATIVE_NUMBER)
fdmAPI.executeDML(SQL, lstParams, True)

# Now the positive so add the AND clause.
SQL = SQL_TEMPLATE % (LOOKUP_DIM, POSITIVE_NUMBER) + SQL_AND
fdmAPI.executeDML(SQL, lstParams, True)

The Event Script I selected is AftImport but there are others you can choose. Look in the Admin Guide or see here for more information on what Event Scripts are available. You will obviously want a script that is executed before the maps are processed. You will also want to add error handling and more comments.

Notice that the script first sets all records to be the negative value and then updates the records with a positive value – this is slightly quicker in terms of execution. I have deliberately put all the processing into this one script. I could have added the negative value to the Expression column on the Import Format but this would mean that if you wanted to change the positive and negative text (e.g. to P and N) you would have to go to two places to make the changes. This way everything that is needed for the AmountSign dimension is in this one script.

Import the data

This is our source data (Account, ICP, Custom1, Custom2, Custom3, Amount):

LD2-DataSource

And this is how it looks after the import with the AmountSign dimension. You can see that you now have a piece of text that you can use in maps:

LD2-DataImported

Multi-Dim maps

Now I can create a Multi-Dim map that references the AmountSign dimension:

LD2-Map

This means that the users can now map by the data amount without any scripting or editing of the labels or logic accounts. And the map is contained in the Export All Dimensions.

Taking it one step further…

There are certain types of account that needs to be accumulated before they can be mapped for example VAT. Logic Accounts are usually used to aggregate source data but they have their own set of problems (difficult to trace back to the ledger, need to ignore the source records, auditors don’t like them…). SQL commands can be used to aggregate data. That means that if there is a requirement to aggregate data before applying the map we might be able to do it in an Event script.

Add a Lookup Dimension (I will call it AmountAccumSign and assign it to UD8) and add it to an Import Format as before. Change the Event Script to this (the new lines have _ACCUM):

# LookUp Dimension
LOOKUP_DIM = 'UD9'
# Lookup dimension for the accumulated amount
LOOKUP_DIM_ACCUM = 'UD8'

# Text for a Positive number
POSITIVE_NUMBER = '+'
# Text for a Negative number
NEGATIVE_NUMBER = '-'

# SQL to update the LookUp Dimension value
SQL_TEMPLATE = """UPDATE TDATASEG_T SET %s = '%s' WHERE LOADID = ? """
# AND clause for the positive amount.
SQL_AND = """AND AMOUNT > 0"""
# SQL for the accumulated amount - positive.
SQL_TEMPLATE_ACCUM = """UPDATE TDATASEG_T SET %s = '%s'
     WHERE LOADID = ? AND (ACCOUNT IN
     (SELECT ACCOUNT
      FROM TDATASEG_T
      GROUP BY LOADID, ACCOUNT
      HAVING LOADID = ? AND SUM(AMOUNT) > 0))"""

# Put the load id into the parameter list
lstParams = [fdmContext["LOADID"]]

# First the Negative - set everything to negative.
SQL = SQL_TEMPLATE % (LOOKUP_DIM, NEGATIVE_NUMBER)
fdmAPI.executeDML(SQL, lstParams, True)

# Now the positive so add the AND clause.
SQL = SQL_TEMPLATE % (LOOKUP_DIM, POSITIVE_NUMBER) + SQL_AND
fdmAPI.executeDML(SQL, lstParams, True)

# Set all the accumulated values to negative
SQL = SQL_TEMPLATE % (LOOKUP_DIM_ACCUM, NEGATIVE_NUMBER)
fdmAPI.executeDML(SQL, lstParams, True)

# Clear out the parameter list because it needs to have the loadid twice
lstParams = []
lstParams = [fdmContext["LOADID"], fdmContext["LOADID"]]

# Update the records to positive where the accumulated amount > zero.
SQL = SQL_TEMPLATE_ACCUM % (LOOKUP_DIM_ACCUM, POSITIVE_NUMBER)
fdmAPI.executeDML(SQL, lstParams, True)

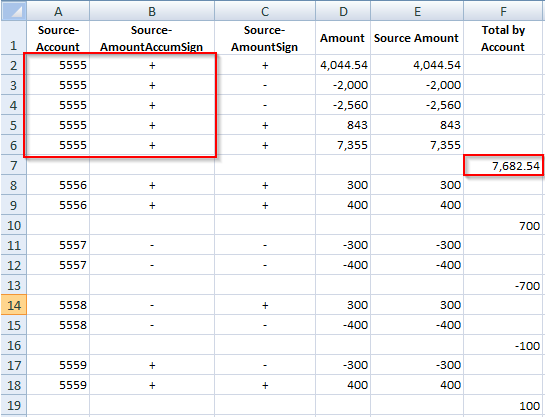
Import the same data and include some test data and this is what you get. I am showing it in Excel format so that it’s easy to show the subtotals by Account:

LD2-DataImported-2

This works well if you are wanting to accumulate the source data by the same dimensions for all the source rows (e.g. Account and Custom1). If you want to accumulate some data by Account and Custom1 and others by Account and Custom2, then this probably won’t work for you and it’s better to stick to Logic Accounts.

NOTE: I have tested this on SQL Server and I can’t see anything that would stop it working on Oracle but I might be wrong.

Conclusion

Using Lookup Dimensions to hold the result of a SQL command works really well and for the most part is transparent to the users. They just see the result as added information. The flexibility of being able to map by data amount (and perhaps accumulated data amount as well) with little impact on the system while keeping it all in standard map format is a big win in my opinion. You can use the same principle for other requirements such as wanting to use <BLANK> in a Multi-Dim map – create a Lookup Dimension and update it to BLANK where the relevant field is empty.

Lookup Dimensions in FDMEE

In this post I will be looking at Lookup Dimensions. There are many references to Lookup Dimensions on the web but I haven’t found anything that really explains what they are, how to use them or why you would want to use them. In this article I will walk through an example of when you might consider using a Lookup Dimension and why.

First of all this is what the manual says:

Lookup dimensions are used for mapping and reference. They can only be used in FDMEE and do not affect the dimensionality of a target application. They can also be used with member mapping functionality to cross-reference multiple source segments and chartfields and assign a target value.

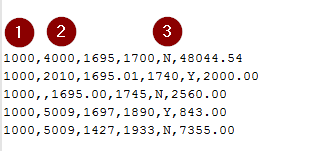
This is not really telling us much about Lookup Dimensions. If you already know what a Lookup Dimension is, then it makes sense. If you don’t, it doesn’t. Let’s start at the same place that most FDMEE engagements do: the ledger extract file.

LD1-SourceFile

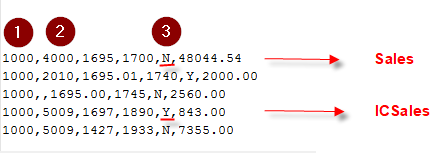
The column marked with 1 contains the Account dimension, the column marked with 2 is the ICP and the column marked with 3 is the intercompany flag (ICP Flag) that identifies if an account is intercompany or not. The source account (1000) needs to be mapped to the account Sales if it’s external and ICSales if it’s internal (i.e. intercompany).

Your first idea might be a Multi-Dim map that checks the ICP member for Account 1000. The problem is that the ledger has no validation on the ICP dimension if the value in ICP Flag is N. Lines 4 and 5 in the sample have the same ICP member but the ICP Flag is different. You need to reference the ICP Flag information but that is currently not on the Import Format.

LD1-SourceFile-2

The standard approach would be to concatenate the Account dimension and ICP Flag. This means the Account map is 1000-Y maps to ICSales and 1000-N maps to Sales. That will work but it means that the maps for all the other accounts will have to be adjusted to take account of the ‘-N’.

You might consider writing an Import Script that modifies the Account or ICP member based on the value in the ICP Flag column. Maybe something like changing the ICP Member to NONE if the ICP Flag is N. This method will work but it’s not easy to implement and you are manipulating the ledger data which is never a good idea. The simple answer of course is to use a Lookup Dimension.

We will create a Lookup Dimension to hold the value of this ICP Flag field and then use Multi-Dim maps for the Account 1000 that reference the Lookup Dimension. It means that the other Account maps are unaffected, there is no messy scripting and it is simple to understand and implement.

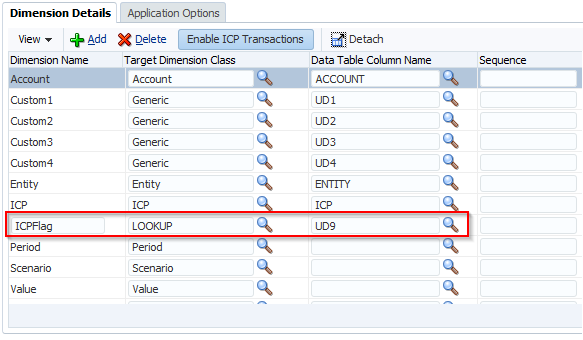
To create a Lookup Dimension go to the Setup tab then Register | Target Application. Select the Target Application and click Add. The Target Dimension Class defaults to LOOKUP. Fill in the Dimension Name (in this case ICPFlag) and the Data Table Column Name. I have chosen UD9 (UD stands for User Defined) but you can select any of the unused columns (there are 20 in total). The order of these UD columns (i.e. the Custom dimensions and Lookup Dimensions) varies; in most places they are sorted by the Dimension Name but in a few places they are sorted by the Data Table Column Name. This means that the order is UD1, UD10, UD11…UD19, UD2, UD20, UD3 etc. I use UD9 to make sure this Lookup Dimension does not appear in the middle of the Custom Dimensions.

LD1-TargetApplSetup

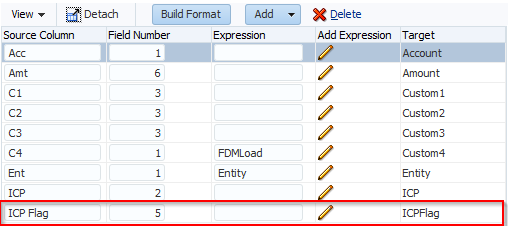
You now have a dimension in your Target Application called ICPFlag. This dimension appears everywhere that a standard dimension does so it is on the Import Format, in the workbench, in the Maps etc. You choose what parts you are going to use. We are going to use the ICPFlag dimension in Multi-Dim maps so we need to update the ICPFlag field on the Import Format:

LD1-ImportFormat

NOTE: Lookup Dimensions are automatically added to the list of dimensions available on the Import Format but they do not have a Field assigned. If you do not assign a Field to the Lookup Dimension on the Import Format for the Data Load Rule on your Point of View, the Lookup Dimension does not appear as a Dimension in Multi-Dim maps. There are times when you want to use a Lookup Dimension for data that is not in the source but you still have to give it a source field.

Import the source data:

LD1-WorkBench

With the Lookup Dimension updated on the Import Format we can add a Multi-Dim map:

LD1-MDMap

The map references the ICP Flag dimension just for the Account 1000. The other Account maps are unaffected and there are no scripts. A Lookup Dimension fits here because the ICP Flag data is not needed in the Target Application and it is only relevant for a small subset of the Account dimension.


Disaster Recovery and FDMEE

In the light of the recent British Airways fiasco where their Disaster Recovery (DR) plan either didn’t work or took days to implement according to your viewpoint, I thought I would share my thoughts on a DR plan for FDMEE. This is meant for implementations where the Production environment is not completely and separately mirrored at another data centre. I will not be talking about which environment you should be using for DR as that will depend on server specifications and data centres and a lot of other things. I will be concentrating on what to extract in order to duplicate FDMEE and how to do it. You will also have to have a DR plan for your Target Applications and Shared Services.

DR Essentials

In my opinion a DR plan should be:

  • easy to implement
  • quick to implement
  • easy to understand
  • robust and reliable

And of course it must work. You might not be able to get all of the above so you might have to compromise somewhere. You need to be confident that your DR plan will work within your timescales.

Database copy

FDMEE is basically a database with a web front-end. A common DR plan for FDM is to put a copy of the Production database in a different environment and then edit the settings so that FDM points to this new database and then update the Machine Profiles. This would be the neatest way of creating a DR application for FDMEE as it would be guaranteed to be the same as Production and has the history. And in theory at least it should be quite quick to create the DR environment.

I have tried to get this method to work but the ODI element adds an extra layer of complexity. I am sure it is possible but I found that the process was becoming difficult to understand, slow to implement and of dubious reliability. It needs manual changes to the application root folder as well as scripts to change the ODI connection strings, followed probably by a server reboot.

LCM Export

If you look in the documentation for FDMEE and LCM you will find little if any reference to DR or even replicating an FDMEE application in a different environment. Using LCM is, I believe, the Oracle supported and recommended way of creating applications across environments but it is not fool proof. For DR, we would take an LCM extract from Production and import it into an existing environment such as Test or Development.

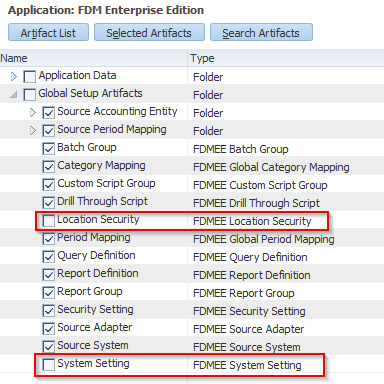
The LCM extract has two components: Global Setup Artifacts and Application Data. For the Global Setup, we want everything except System Setting because that contains the references to the Application Root folder which is probably on the Production server. I also recommend not extracting the Location Security because I have found it causes the import to fail. This Artifact was recently introduced (patch 210?) so might not be in your environment. The selections would be like this:

DR-LCM-Global select

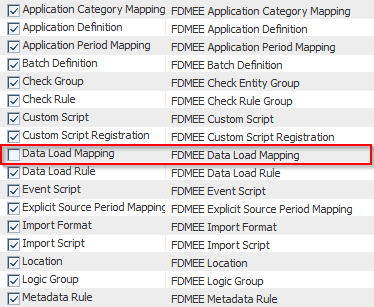
For the Application Data, I select everything except Data Load Mapping:

DR-LCM-Application select

There are a number of reasons for not selecting the maps:

  • there are/were problems with importing members with certain characters
  • the maps are merged not replaced
  • if there are any problems in any location, no maps are imported into any location

For me, the final reason is the killer. The LCM import has more stringent validations than the import through the workspace. This means that it is possible to import a map through the workspace that the LCM import will reject. If the LCM import has a problem with a single map, no maps are loaded for any location. And you are not told what map or what location is causing the problem (error EPMFDM-140072). It only takes a single location to load their maps with ‘No Validate’ selected to stop all maps all locations from being imported.

FDMEE Custom script – Maps

The LCM export does not contain the Data Load Mappings and for this I use a custom script. The script exports all the maps for all the locations into separate files. I usually leave these files on the Production server so that there is a backup of the maps and then have an automated process that copies the files to the DR server.

The format of these files is the All Dimensions text format so that there is only one file per location. This means that you cannot use Jython or SQL scripts in the maps but I have found that multi-dimensional maps and lookup dimensions provide enough functionality to do away with scripting (so far at least). The manual says that Jython and SQL Scripts are not supported when importing from Excel either so the only supported methods for these are LCM or manual entry.

Invoking DR

When the time comes to invoke DR, the administrator imports the LCM extract. Then either the administrator or the users import the maps through Data Load Mapping in the workspace. Once Shared Services (and possibly the Target Applications) are imported, the DR application is ready.

Automation

The LCM export can be automated using the Utility.bat or Utility.sh file. The custom script export of the maps can be automated using the executescript.bat (or .sh) file. You can schedule the exports to run overnight so that the previous day’s application is always available in export files. You might want to consider automating an LCM extract on what will become the DR environment so that you can set it back to what it was.

LCM shortcomings

LCM has a number of shortcomings. A potential large problem is that an LCM import is a Merge not a Replace. So items in the application being updated are never deleted. This means that it is possible that the DR application is not the same as the source Production application.  Since the maps are imported through the workspace, they are not affected. The principal areas where this might be a problem are Logic Account Group, Check Entity Group and Check Rule Group. If, for example, the application that will become the DR application has an extra Logic Account, this will possibly mean that the data loaded from the DR application is not the same as the Production application.

For the LCM extract to work the name of the Target Applications in the Production and DR environments must be the same. If they are different, you will have to edit the LCM extract. If the actual Target Application does not exist, the LCM import will fail. If the actual Target Application exists and it has not been added to FDMEE yet, LCM will add it.

If the Import Formats already exist in FDMEE but are assigned to a different Target Application, the LCM Import will fail. For example, you are using the Development environment as your DR environment. In Development you have created a new Target Application called MGMT2018 and the Import Formats point to this Target. The LCM Import will fail because the Import Formats in the DR file already exist and point to a different Target Application. You will have to delete the Target Application in FDMEE (Development).


FDMEE Security simplified

FDMEE Security can be a bit of a headache so in this blog I want to look at it in a bit more detail. I have never been happy with the sheer number of native groups that are created. All the literature on the subject says the same thing about designing security so here’s my opinion for what it’s worth.

There are two things to consider: user access and location access. Security by location is optional. If security by location is not enabled, every user has access to all locations. Every application I have seen has location access enabled. With security by location enabled, Shared Services native groups are created and, in order for a user to get access to the location, they must be added to the location group. A native group is created for each location and location security template combination. You can provision the users and/or the location native groups.

In a typical application you would have DATALOAD and DATAMAP type security location templates and you might have other security roles as well. The templates have a security role (e.g. Run Integration, Intermediate2 etc) which will give you a set of provisioned native groups per location. Add the users to the relevant native group for their locations and that’s it. The users are not directly provisioned. The users’ access comes from the security role that is applied to the location native groups.

As an example, say you have two locations: London and Paris. And you have two security templates: both have the prefix FDMEE and then the suffix is DataLoad and DataMap. They have the relevant roles applied to them. This means you will have four native groups in Shared Services: FDMEE_London_DataLoad, FDMEE_London_DataMap, FDMEE_Paris_DataLoad, FDMEE_Paris_DataMap.

So you provision the location native groups and add the users to these groups. You could also provision the users directly but that means that you are assigning security in two different places which makes things very confusing.

Why do you have different security templates which will produce a variety of roles per location? The reason must be that this allows you to have a user whose security role changes by location i.e. data loader here and data mapper there. The problem is that FDMEE security doesn’t work that way (tested in 11.1.2.3 and 11.1.2.4 up to .210 patch). If a user is provisioned somehow by more than one native group (e.g. DataLoad for London, DataMap for Paris), the permissions accumulate. The user has the same access rights to all their locations. If the user is provisioned to manage the maps in one location, they can manage the maps in all locations they have access to.

In effect, this means that the security is based on the user not the location. So having multiple security templates per location is pointless. You just need one location security template (e.g. FDMEE_<location>_Access) that will provide the users with access to the locations and that template does not have any permissions/roles set. You add the users to the location native group(s) and this only gives the users access to the location; there is no provisioning associated with it. You then create 3 – 4 native groups for the users e.g. FDMEE_DATALOAD, FDMEE_DATAMAP, FDMEE_ADMIN, provision them appropriately and add the users to the relevant groups.

If you provision the user rather than the location, security is much simpler from a number of aspects. Firstly you have much fewer location native groups; you still have to add the users to the groups but the list is much smaller. Secondly the security is provisioned in one place – the user native group. If you provision the location groups, you have to check what security a user has in all location groups to work out the actual access they have. Even worse, if someone asks who has access to manage the maps in a location, you have to get a list of all users who have any type of access to that location and then check the access they have in all their other locations. Following on from the previous example, if the country manager asks who can change the maps in Paris, it’s not enough to look at the users in the group FDMEE_Paris_DataMap. You will also have to look at the users in FDMEE_Paris_DataLoad and then check that list of users to see if they have been added to any DataMap groups.

Migrating FDM maps to FDMEE

** UPDATED SEE BELOW **

The recommended way of migrating FDM to FDMEE is to use the migration utility. This utility is a quick way of creating your complete (almost) FDM application in FDMEE. It works at a database level so there are no options to specify what you want to migrate. Once the FDMEE application is created the migration utility isn’t used again. The migration utility is used when you are not making any changes to the application, it’s simply a software upgrade. It does have limitations and doesn’t work for everyone but it’s a good option for a lot of people.

It’s more of a challenge keeping FDM in step with FDMEE once the application has been created. FDM is the production system while FDMEE is the new development. FDM will probably continue to change. The main changes are going to be in the maps so you need a quick and reliable way of comparing and transferring the maps from FDM to FDMEE. Your first thought is probably to export the FDM maps to Excel because you can also do that in FDMEE and then you can compare the two outputs somehow. But you will have to do the export for each dimension in every location. And you will have to manipulate the output maybe even save it as a CSV if you want to compare with FDMEE.

There is a much quicker way of exporting the maps. FDM comes with scripts which are executed from the workbench client that export the maps for one or all dimensions:

migratemaps-wbc

The downside is that these scripts do not export enough information that can be used as an import for FDMEE and IN type maps are not included. So the answer is to write your own script to export the maps in a format that FDMEE can use.

I am not going to go through the details of how to write a custom script for FDM (internet search – filetype:pdf “fdm” “scripting guide”) but I will go through the high-level design. If you are still not sure then contact your consulting partner (or even better me 🙂 ).

Firstly you want to get a recordset of all the locations which do not have a parent and are data load type (PARTCONTROLSTYPE = 1). Then you want to query the maps table for each location and write the data to a separate file for each location. The hardest part of the script is actually the SQL for reading the maps because it needs to put the maps in FDMEE format. So here is the SQL (I have tested this on SQL Server. You will need to change + to || for Oracle.):

SELECT DISTINCT UPPER(DimName) AS DimName,
CASE
WHEN MAP.WHERECLAUSETYPE = 'BETWEEN' THEN REPLACE(MAP.WHERECLAUSEVALUE, ',', '>')
WHEN MAP.WHERECLAUSETYPE = 'LIKE' THEN MAP.WHERECLAUSEVALUE
WHEN MAP.WHERECLAUSETYPE = 'IN' THEN MAP.WHERECLAUSEVALUE
ELSE MAP.SRCKEY
END AS SRCKEY,
CASE
MAP.DIMNAME WHEN 'ACCOUNT' THEN CASE MAP.CHANGESIGN WHEN 1 THEN '-' + MAP.TARGKEY ELSE MAP.TARGKEY END
ELSE MAP.TARGKEY
END AS TARGKEY,
CASE
WHEN MAP.WHERECLAUSETYPE = 'BETWEEN' THEN MAP.SRCKEY
WHEN MAP.WHERECLAUSETYPE = 'LIKE' THEN MAP.SRCKEY
WHEN MAP.WHERECLAUSETYPE = 'IN' THEN MAP.SRCKEY
ELSE NULL
END AS NAME,
SRCDESC
FROM TDATAMAP AS MAP
WHERE (PARTITIONKEY = @LOCKEY@)
ORDER BY DIMNAME, SRCKEY

You then update the string @LOCKEY@ with the location key for each location. You can read through the columns in the recordset with a For loop:

For nFieldCounter = 0 To rsMap.Fields.Count - 1
' Get the next value
strFieldValue = rsMap.Fields(nFieldCounter).Value
....
Next  

Don’t forget that you will need an extra field in the export file for the Data Load Rule.

This script will create text files that can be directly imported into FDMEE. With a matching script for FDMEE (see FDMEEtoolbox), you now have a quick and robust method for exporting all the maps from FDM and FDMEE in the same format. If you use something like UltraCompare or BeyondCompare, you can easily check the differences between the two sets of files.


Update

A client of mine pointed out a difference between FDM and FDMEE that I was not aware of. The Change Sign setting controls whether or not to multiply the data amount by -1. This is applied to the Account dimension only. So that’s standard FDM/FDMEE mapping. You can accidentally apply the Change Sign setting to other dimensions if you manage the maps in Excel or a text file. This is where the difference between FDM and FDMEE comes in. FDM ignores the Change Sign setting in the other dimensions; FDMEE doesn’t. If you have, for example, flagged a Custom map as Change Sign, it will be used. You have to export the maps and check them externally because the Change Sign setting only appears for the Account dimension in the workspace. This is the case in 11.1.2.4.200 – I haven’t had a chance to check 210 yet.

I have updated the SQL statement so that the Change Sign setting is only applied to the Account dimension.

Creating an Excel spreadsheet from FDMEE using Jython

A client recently asked me to write a report in FDMEE to show the HFM Data Load error file. They didn’t want to use the Intersection Validation Report because it stopped the process. They wanted to get into HFM whatever data they could and then review the error file to identify problems. I wrote the script and the report but, while it worked perfectly on my environment, it didn’t work on the client’s. My heart sank because trying to work out why a report is not displaying the data can be very time-consuming so I thought I would investigate a different way of doing it.

The most direct way of allowing the user to review the load errors is to show the load error file to the user. The actual load error file format is not great so I thought the best way was to read the HFM data load error file into an Excel spreadsheet and then use the FDMEE function showCustomFile. I wrote a test script for the AftLoad event to show the actual error file using the fdmAPI function showCustomFile. That worked so the only problem now was how to write the contents of the error file into Excel.

There was nothing in the documentation or API on how to write to Excel although FDMEE can clearly do it because of the export to Excel in maps. An internet search for “Jython create excel” pointed me to this page:

https://community.oracle.com/thread/3770307?start=0&tstart=0

And from that page I deduced that the Java module that FDMEE uses to create Excel files is called POI. A second internet search for “python excel poi” pointed me to this page:

https://wiki.python.org/jython/PoiExample

And this gave me the code for creating a spreadsheet using POI. I put the two pieces of code together and with a little bit of tinkering, it works. It creates an Excel spreadsheet which I can then show to the user using showCustomFile. It is then relatively simple to read the error file and put it into table format in Excel. It is a great alternative if the Intersection Validation Report is not appropriate.

I have attached my test script for creating an Excel spreadsheet here: ExportToExcel. You will need to review the import section to make sure that it is pointing to the correct folder in your environment (lines 2 and 3). And you will also need to check the folder for the output (line 12). The script is also below but if you copy it the indentation is lost. If you can’t download the script let me know and I will send it to you:


from sys import path
path.append("C:\\Oracle\\Middleware\\EPMSystem11R1\\products\\FinancialDataQuality\\lib\\poi-3.8-20120326.jar")
path.append("C:\\Oracle\\Middleware\\EPMSystem11R1\\products\\FinancialDataQuality\\lib\\poi-ooxml-3.8-20120326.jar")

from java.io import FileOutputStream
from java.util import Date
from java.lang import System, Math
from org.apache.poi.hssf.usermodel import *
from org.apache.poi.hssf.util import HSSFColor

wb = HSSFWorkbook()
fileOut = FileOutputStream(“C:\\TEMP\\POIOut2.xls”)

# Create 3 sheets
sheet1 = wb.createSheet(“Sheet1”)
sheet2 = wb.createSheet(“Sheet2”)
sheet3 = wb.createSheet(“Sheet3”)
sheet3 = wb.createSheet(“Sheet4”)

# Create a header style
styleHeader = wb.createCellStyle()
fontHeader = wb.createFont()
fontHeader.setBoldweight(2)
fontHeader.setFontHeightInPoints(14)
fontHeader.setFontName(“Arial”)
styleHeader.setFont(fontHeader)

# Create a style used for the first column
style0 = wb.createCellStyle()
font0 = wb.createFont()
font0.setColor(HSSFColor.RED.index)
style0.setFont(font0)

# Create the style used for dates.
styleDates = wb.createCellStyle()
styleDates.setDataFormat(HSSFDataFormat.getBuiltinFormat(“m/d/yy h:mm”))

# create the headers
rowHeader = sheet1.createRow(1)
# String value
cell0 = rowHeader.createCell(0)
cell0.setCellStyle(styleHeader)
cell0.setCellValue(“Name”)

# numbers
for i in range(0, 8, 1):
cell = rowHeader.createCell((i + 1))
cell.setCellStyle(styleHeader)
cell.setCellValue(“Data ” + str( (i + 1)) )

# Date
cell10 = rowHeader.createCell(9)
cell10.setCellValue(“Date”)
cell10.setCellStyle(styleHeader)

for i in range(0, 100, 1):
# create a new row
row = sheet1.createRow(i + 2)
for j in range(0, 10, 1):
# create each cell
cell = row.createCell(j)
# Fill the first column with strings
if j == 0:
cell.setCellValue(“Product ” + str(i))
cell.setCellStyle(style0)

# Fill the next 8 columns with numbers.
elif j < 9:
cell.setCellValue( (Math.random() * 100))

# Fill the last column with dates.
else:
cell.setCellValue(Date())
cell.setCellStyle(styleDates)

# Summary row
rowSummary = sheet1.createRow(102)
sumStyle = wb.createCellStyle()
sumFont = wb.createFont()
sumFont.setBoldweight( 5)
sumFont.setFontHeightInPoints(12)
sumStyle.setFont(sumFont)
sumStyle.setFillPattern(HSSFCellStyle.FINE_DOTS)
sumStyle.setFillForegroundColor(HSSFColor.GREEN.index)

cellSum0 = rowSummary.createCell( 0)
cellSum0.setCellValue(“TOTALS:”)
cellSum0.setCellStyle(sumStyle)

# numbers
# B
cellB = rowSummary.createCell( 1)
cellB.setCellStyle(sumStyle)
cellB.setCellFormula(“SUM(B3:B102)”)

wb.write(fileOut)
fileOut.close()

Managing maps in FDMEE (or how brilliant are Multi-Dim maps)

In this blog I want to look at how to manage FDMEE maps. By that I mean a reliable and repeatable process for importing and exporting that is simple for the users and covers all the different maps. The process must take an export from FDMEE and create an import file in the correct format. Currently in FDMEE you can’t do this – there are problems with scripts, Data Load Rules, what is exported and what can be imported.

From an FDM point of view, it is very common to manage maps in Excel. It gives you a backup of the maps outside FDM and allows the maps to be reviewed, signed off and audited with a minimum of fuss and training. Using Excel for FDMEE maps is not the same. In FDM there were scripts to extract all the maps by location which could be scheduled to run once a month. This gives you a backup and an audit of the maps. You can do the same in FDMEE but it is a little more difficult because you have to write the scripts from scratch. In FDM you can import the maps through the Excel interface. You can do the same in FDMEE but it does not import all the map information and some of the data is not supported.

Scripts
The FDMEE Admin guide refers to scripts in maps as Conditional Mapping. These are the scripts that you write in Jython or SQL not the Multi-Dimensional maps. Exporting and importing these Jython/SQL scripts is problematic. In FDM, scripts in maps can be exported and imported through the Excel interface. That’s FDM, what about FDMEE? The Admin Guide says: “FDMEE does not support #SQL and #SCRIPT for Excel mappings”. OK so that just about kills that one dead then. The FDMEE Excel template is set up to include the VBScript column in the upload named range (and yes it is called VBScript even though the language is Jython/SQL). I have used the template for importing Conditional maps and it works. The problem is that the Admin guide says that it’s not supported. So is it that there is a problem with importing these scripts that I haven’t come across yet or have I strayed into a “consultants only” area? I don’t know but I am certain of one thing: if the manual says don’t do it then you need to have a very good reason for ignoring that.

Here is an overview of the functionality for exporting and importing:

FDMEE-Export

Export – Excel

• Scripts are not exported from Data Load Mapping. The #SCRIPT/#SQL header record is exported but the actual script that is executed is not.
• In 11.1.2.4 all map information can be exported through the Excel Interface. In 11.1.2.3 you have to write a custom script to export all the map information or use LCM.
• Current dimension only.
• I have found that the Export to Excel sometimes produces a file with just the column headings.

Export – Text (Current Dimension and All Dimensions)

• Scripts are not exported from Data Load Mapping. The #SCRIPT/#SQL header record is exported but the actual script that is executed is not.
• Current dimension or All dimensions can be exported.
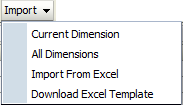
FDMEE-Import
Import – Excel

• Importing scripts in maps (#SCRIPT/#SQL) through the Excel interface is not supported. Possible (?) just not supported.
• You can use LCM but that contains maps for the whole application and not just the maps for a single location.
• You cannot use the Excel Interface in 11.1.2.4 to import maps – it does not increment the DataKey column correctly and it will corrupt the maps.
• You can write a custom script that reads a text file and imports these Conditional maps.

Import – Text (Current Dimension and All Dimensions)

• Importing scripts in maps (#SCRIPT/#SQL) through text files is not possible.

In summary, exporting and importing scripts in maps is difficult. I keep scripts in maps down to absolute minimum. I always have an external backup of the scripts because I use Notepad++ not the internal editor.

Data Load Rules
A map can be restricted to a Data Load Rule and this information can be exported and imported. The problem here is in the Excel interface because it uses the Data Rule Name id not the name. The default Excel template that can be downloaded from FDMEE does not include the Data Rule Name column in the named range. You can change the named range to include the column but you must make sure you use the id not the name.

Suggested strategy
Above all, we want a reliable method of exporting and importing all the relevant map information. That means it must be text format – the Excel route is one dimension at a time for export, does not always work and the Data Load Rule is tricky. There are two problems we need to overcome: Scripts and Data Load Rules. If we use text format the Data Load Rule problem is fixed; you can just add the name of the Data Load Rule. That leaves the maps with scripts and a simple way of getting around this problem is not to use them. It’s not enough to say ‘don’t use them’ because there are times when you don’t have a choice. So we will look at a great alternative to scripts in maps: Multi-Dimensional maps.

Multi-Dimensional maps
Scripts in maps are used to do what is not possible in standard maps such as check the target values in other dimensions or map based on the data amount. We know we can use Multi-Dimensional maps to reference the source values in other dimensions. What the manual does not tell you is that with Multi-Dimensional maps you can reference target dimensions, the amount, specify ‘not’ conditions etc. The workspace won’t let you do any of this but the text file will. NOTE: this has been tested on a SQL Server database; things might be different on Oracle.

Here is an example of a multi-dimensional map in a text file:
UD2,#MULTIDIM UD1=[OtherInterest],INTOTH,mINTOTH,,

This is saying if the source Custom1 member is OtherInterest, then map Custom2 to INTOTH. The rule name is mINTOTH. You can reference the Target dimension by adding X to the end of the dimension name. So if I change UD1 to UD1X it will look at the Target Custom1 member:
UD2,#MULTIDIM UD1X=[OTHINT],INTOTH,mINTOTH,,

That means if the Target Custom1 member is OTHINT, then map to INTOTH. You can’t edit these maps in the workspace – they have to be managed in the text files.

You can also reference the data amount by using the AMOUNT or AMOUNTX column so, as an example, map to one account if it’s a credit and another if it’s a debit. The Multi-Dim map only works if there is an equals sign (=) so if you want to map based on amounts you must use <= or >=:

UD2,#MULTIDIM AMOUNT >=[0],POSITIVE,mTEST_P,,
UD2,#MULTIDIM AMOUNT <=[0],NEGATIVE,mTEST_N,,

AmountMap

There have been many occasions when it would have saved a lot of time and mapping if I could just have said if the source does NOT begin with 8 (for example) then map here. Well you can do that too using Multi-Dims. Again the key here is that the Multi-Dim part in the text file must contain an equals sign so we use != instead of <>:
UD2,#MULTIDIM Account !=[1100],OHDETOTH,MOHDIRECT,,

So if the Account is not equal to 1100, then map the Custom2 member to OHDETOTH. And this is how it looks in the workspace:
MD-NotMap

On the downside though there is a laughable bug in Multi-Dim maps. I say laughable because when I first saw it I thought it was funny. It’s not so funny when you try and find a way around it however. I have only tested this on 11.1.2.3 so it might be fixed in 11.1.2.4. Anyway, the bug is if the source value contains OR in capitals, then FDMEE thinks it is a keyword. So CORE becomes C”OR”E:
MD-Core
MD-Core-2
The workaround is to use lower case but if your database is Oracle, then you will probably need to think of something else.

Conclusion
Using Multi-Dimensional maps is a great alternative to Jython or SQL scripts. It means that you can have a safe and reliable way of importing and exporting maps. There are some things Multi-Dim maps can’t do but they have greatly reduced the need for scripts. Now use Excel as a front end to these text files (import and export) and you have a robust and easy to use way of managing and backing up the maps.