The auditing of application changes in HFM has improved recently with the introduction of the metadata load changes feature. This is an excellent enhancement but it does have its problems. In my previous blog I talked about how the Audit Extract Utility has not been updated to manage the metadata load changes audit log and how you mitigate the problems. In this blog I will look at the metadata load changes audit records in more detail. Note that the SQL used in the scripts works on SQL Server only; it will not work on Oracle databases.
Metadata Load Changes
The Metadata Load Changes feature is accessed from the Navigate menu: Administer | Consolidation Administration | Audit | Tasks. There is a log for each metadata load and a matching log for the Metadata Load Differences. Against both logs there is a link icon. When you click on the icon, it prompts you to save the log as a text file with the default name Attachment.txt.

What should be in the audit
Firstly I want to talk about what I think an audit log should contain and how it is presented. In short, an audit log must tell you who made what changes at what time and why they made them. And the audit must be complete (i.e. no significant gaps) with no means of changing it (i.e. not a text or Excel file etc.).
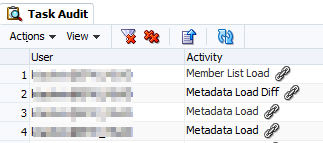
The Task Audit view through Consolidation Administration gives us some of this information (who and when). And if you then go into each of the links you will get the ‘what has changed’. Compare that list with your change request logs and you will get the ‘why’.
Ideally you should also be able to answer questions such as ‘show me the changes in metadata that have been made to the account ABC’. You could do it, but it would take time to go through the Task Audit logs and save each one with a meaningful file name.
How does HFM audit compare?
On the face of it the auditing in HFM shapes up really well. It’s only when you look at it in more detail do you realise that there are some problems. A significant problem is the output for the audit logs. You have to select each log one at a time, save them and change the default filename: Attachment.txt. It’s a text file so there’s nothing to stop you from changing the contents. The log information doesn’t contain who made the change or the date so you have to either edit the file or change the filename to contain that information. This is very poor from an audit perspective.
But there’s more. If you look in the HFM Admin guide and check which characters are invalid for the member label, you will notice that the ampersand (&) is not in the list. So, for example, an account called R&D is valid. Ampersand is not valid for descriptions and not for Cell Text labels. But then in the Loading Metadata section, the manual says:
Note: Do not use the ampersand character ( & ) in a metadata file. If you do, an error occurs.
I can tell you that the error (whatever it is) does not show itself when you load metadata. And I have seen applications happily using ampersand in the member label. I can also tell you that it does cause an error in the view task audit logs. If there is an ampersand in a member label, when you click the link in Consolidation Administration the audit log will display up to and not including the ampersand. Any changes after the ampersand are not in the log. If the ampersand is in something like a userdefined field, it does not cause a problem. I don’t know if any other characters cause the same problem. Safest route then is not to use ampersand anywhere and any other non-numeric/non-alphabetical characters with great care.
In summary then, the HFM Task Audit captures all the changes (probably), in text file format and you will have to edit the files if you want to save them offline. ‘Room for improvement’ as my better school reports used to say.
An alternative
The Task Audit detail information in the database is complete regardless of whether there is an ampersand. The ampersand only causes a problem when you try to download it. So you can potentially write a script to extract the Task Audit detail. And while you are at it, add the missing user and date/time information and save it as a PDF. And it just so happens, I have done exactly that.
Script overview
The output is going to be a PDF file for each metadata type load (i.e. metadata, rules, member lists and security) with the username, date and time in the file and filename. The first step is to get a list of the logs which have an attachment; the second step is to read that list and create the attachment for the log entry.
The Task Audit logs are held in two tables: APPNAME_TASK_AUDIT and APPNAME_TASK_AUDIT_ATT.
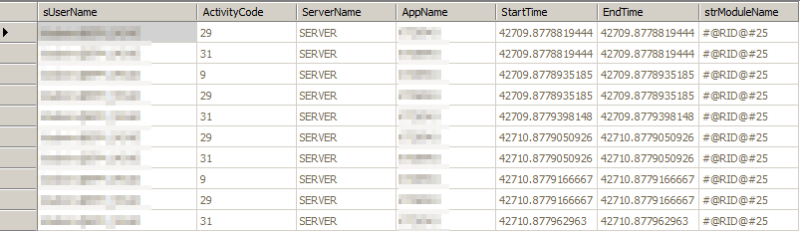
This is the first table (TASK_AUDIT):

And the second (attachments) table (TASK_AUDIT_ATT):

The first table contains the information you see in Consolidation Administration. There is a single database record for each log entry. The second table is the information that is used to create the attachments. There are one or more records for each log entry. We want a combination of data from these two tables (and we also want data from the user table to convert the user name). The script reads the first table and picks off the username, date, time and attachment id. It then reads the attachment table and exports the records for a single log entry and saves it with the username, date, time and audit type in the file name.
This is the SQL statement that is used as the basis for creating the exported audit logs:
SELECT CONVERT(VARCHAR(4), DATEPART(yyyy, DATEADD(dd, -2, A.StartTime))) + RIGHT('00' + CONVERT(VARCHAR(2), DATEPART(month, DATEADD(dd,-2, A.StartTime))), 2) +
RIGHT('00' + CONVERT(VARCHAR(2), DATEPART(dd, DATEADD(dd, -2, A.StartTime))), 2) AS ThisDate,
RIGHT('00' + CONVERT(VARCHAR(2), DATEPART(hour, DATEADD(dd, -2, A.StartTime))), 2) +
RIGHT('00' + CONVERT(VARCHAR(2), DATEPART(mi, DATEADD(dd, -2, A.StartTime))), 2) AS ThisTime,
A.strGUID,
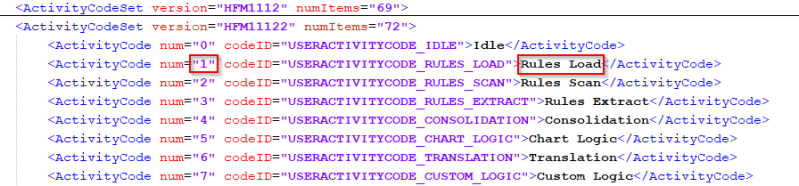
CASE A.ActivityCode
WHEN 1 THEN 'Rules'
WHEN 21 THEN 'Metadata'
WHEN 23 THEN 'Member List'
WHEN 26 THEN 'Security'
WHEN 75 THEN 'Metadata Load Diffs'
END AS Activity,
CASE
WHEN CHARINDEX('\', U.sUserName) > 0 AND CHARINDEX('@', U.sUserName) > 0 THEN SUBSTRING(U.sUserName,
CHARINDEX('\', U.sUserName) + 1,
LEN(U.sUserName) - CHARINDEX('\', U.sUserName) -
CHARINDEX('@', U.sUserName))
WHEN CHARINDEX('\', U.sUserName) > 0
THEN SUBSTRING(U.sUserName,
CHARINDEX('\', U.sUserName),
LEN(U.sUserName) - CHARINDEX('\', U.sUserName))
WHEN CHARINDEX('@', U.sUserName) > 0
THEN SUBSTRING(U.sUserName, 0, CHARINDEX('@', U.sUserName))
ELSE U.sUserName
END AS UserName,
CASE A.ActivityCode
WHEN 75 THEN '.XML'
ELSE '.TXT'
END AS FileExtension
FROM %APPNAME%_TASK_AUDIT AS A INNER JOIN
HSV_ACTIVITY_USERS AS U ON A.ActivityUserID = U.lUserID
WHERE (A.ActivityCode IN (1, 21, 23, 26, 75))
ORDER BY A.StartTime
Click here to download.
The attachment data in the database is held in XML format for the Metadata Load Differences log and in text file format for all the other logs. The script removes any domain names from the username as the \ character causes a problem when creating the output file.
Change %APPNAME% to the name of your HFM application and save the script to a file (e.g. SQLScript.sql). You then use sqlcmd to execute the script and put the output in a temporary file something like this:
sqlcmd -S SQLServer -E -d SQLDatabase -i SQLScript.sql -h-1 -o “Dir\OutFile.txt” -s “|” –W
This will create a file with an audit record on each line:

The first field contains the audit record date, then the time, the audit record id, type of audit record, the person who executed it and finally the file type. Six columns in all separated by |. Now you read each record and query the attachments table based on the third column: the id. You can do this through VB Script or batch files. Here it is as a batch file:
REM Each line has 6 columns of data. Put them into A,B,C,D etc

for /F "tokens=1,2,3,4,5,6 delims=|" %%A in (Dir\OutFile.txt) do (

echo %%A %%B %%C %%D %%E %%F

if "%%A"=="" (

ECHO Found a blank line...

goto :eof

)

if "%%A" NEQ "" (

REM Create a script file to export a single log record

echo Creating script for guid %%C... >> log.txt

echo bcp "SELECT CONVERT(char(2000), attachment) FROM

%APPNAME%_TASK_AUDIT_ATT WHERE guid = '%%C' ORDER BY idx" queryout

"%DIR%\%%A_%%B_%%D_%%E%%F" -T -c -C RAW -d SQLDatabase > execme.bat

call execme.bat

)

)

:eof
The attachment itself is stored in the attachment column as binary data or a BLOB (binary large object). Each record holds 2000 characters and the column idx is incremented so that if the attachment is longer than 2000 characters they can be stitched together.
This will produce a separate text file for each log that has an attachment. The file will be in UTF-16 format (Unicode) and there will be padding characters at the end of the file because the text file is being created in blocks of 2,000 characters. The file name will contain the date, time, username and log file type. For some people this is enough. Other people want to have these files printed to PDF.
Clean up the text files
The padding characters at the end of the file are confusing and clumsy so they need to be cleaned up. Here is some VBScript code that will do that (it might need tweaking if the server language is not English):
Set Stream = fso.OpenTextFile(sSourceFile, ForReading, False)

intAsc1Chr = Asc(Stream.read(1))

intAsc2Chr = Asc(Stream.read(1))

Stream.Close

If intAsc1Chr = 255 And intAsc2Chr = 254 Then

OpenAsUnicode = True

Else

OpenAsUnicode = False

End If

Set Stream = fso.OpenTextFile(sSourceFile, ForReading, False, OpenAsUnicode)

' Read file one char at a time and check it is within the ASCII range.

Do While Not Stream.AtEndOfStream

sChar = Stream.read(1)

If OpenAsUnicode = True Then

nCharASCII = AscW(sChar)

Else

nCharASCII = Asc(sChar)

End If

If nCharASCII >= 32 And nCharASCII <= 126 Then

' ASCII character so add it to the output

sText = sText & sChar

ElseIf nCharASCII = 9 Or nCharASCII = 10 Then

' Tab or new line so add to the output

sText = sText & sChar

End If

Loop
Click here to download.
And then print the text to a new file using the username, time, date and filetype to identify what the file contains.
Process the XML file
The Metadata Changes file is in XML format which is not easy to read so you will need to process it into human readable form. You might also want to put a header in the new file using the username, time and date from the other fields in the row.
This is the code I use for converting the XML. You are reading the OutFile.txt to get the name of the XML file as well as the user and date information. These are passed through to this script to be added to the header. It creates a file which is very similar to the output from HFM with a few improvements:
Set NewFile = fso.CreateTextFile(sOutputFile, True, False)

NewFile.WriteLine("Loaded By: " & sUser)

NewFile.WriteLine("Date: " & sFileDate)

NewFile.WriteLine("Time: " & sFileTime)

NewFile.WriteLine("Type: Metadata Load Differences")

NewFile.WriteLine("")

Set xmlDoc = CreateObject("Microsoft.XMLDOM")

xmlDoc.async = "false"

xmlDoc.Load sCleanedXMLFile

Set objRoot = xmlDoc.DocumentElement

For Each childNode In objRoot.ChildNodes

If childNode.BaseName = "DIM" Then

Set attrib = childNode.Attributes

For Each i In attrib

NewFile.WriteLine("Dimension: **  " & i.Value & "  **")

Next

Else

NewFile.WriteLine("Node: " & childNode.BaseName)

End If

ProcessNode childNode, i, ""

NewFile.WriteLine("")

Next

NewFile.Close
Function ProcessNode(childNode, Counter, prevTagName)

Dim attrib

Dim i

Dim Nodes

Dim tagName

Dim member

Dim attribName

Dim prevSetting

Dim newSetting

Counter = Counter + 1

If childNode.Attributes Is Nothing Then

Else

If childNode.Attributes.Length > 0 And Counter > 1 Then

Set attrib = childNode.Attributes

For Each i In attrib

select case lcase(i.BaseName)

case "att"

attribname = i.Value

case "old"

prevSetting = i.Value

case "new"

newSetting = i.Value

end select

Next

If prevTagName = "NCHG" Then

NewFile.WriteLine("    Changed aggregation weight from " & prevSetting & " to " & newSetting)

Else

NewFile.WriteLine("  Changed " & attribName & " for member " & member & " from " & prevSetting & " to " & newSetting)

End If

End If

End If

If childNode.ChildNodes.Length > 0 Then

Set Nodes = childNode.ChildNodes

For Each i In Nodes

On Error Resume Next

tagName = vbNullString

tagName = i.tagName

member = vbNullString

member = i.Text

On Error GoTo 0

If len(member) > 0 then

Select Case tagName

Case "MADD"

NewFile.WriteLine("  Added member: " & i.Text)

Case "MCHG"

NewFile.WriteLine("  Changed member: " & i.Text)

Case "MDEL"

NewFile.WriteLine("  Deleted member: " & i.Text)

Case "NADD"

NewFile.WriteLine("  Added parent/child: " & i.Text)

Case "NCHG"

NewFile.WriteLine("  Changed parent/child: " & i.Text

Case "NDEL"

NewFile.WriteLine("  Deleted parent/child: " & i.Text)

Case Else

'NewFile.WriteLine("  Unknown: " & tagName)

End Select

End If

ProcessNode i, Counter, tagName

Next

End If

End Function
Click here to download.
Print to PDF
The final step is printing to PDF and normally that causes a lot of problems. However you can simply open the new text file in Word and save it as a PDF. For this to work you need to run your script from a computer which has Microsoft Office installed. I found a script that does exactly that here:
http://mydailyjava.blogspot.co.uk/2013/05/converting-microsoft-doc-or-docx-files.html
That’s it. Now there is a process which can be automated that will extract all audit logs and print them to PDF. The PDF file names contain who did what and when. In the logs themselves the usernames and times have also been added.