FDMEE – Mapping based on the data amount

In my previous blog I talked about Lookup Dimensions and how they can be used to simplify mapping by storing information that is relevant to a small subset of accounts. In this blog I want to talk about how to use Lookup Dimensions to store calculated data. By ‘calculated’ I mean data that is not in the source such as the Target member as a Source. See Francisco’s excellent blog for an example here. I will be going through an example of how to use a Lookup Dimension so that you can easily map based on the data amount.

Mapping requirement

It is quite a common FDMEE requirement to want to map based on the data amount. For example if the value is positive it should go the debtor account and if it’s negative the creditor account. I have blogged about this before and all of the methods had a drawback of some sort. I think I have now come up with a really simple and effective method using Lookup Dimensions.

Before I go into the detail I want to lay down the ground rules:

  • Easy for the users to manage
  • The map must be contained in the Export All Dimensions to text file extract
  • No manipulating of the source labels
  • Editable in the workspace
  • Preferably not through Logic Accounts
  • Minimal scripting

Multi-Dim maps

Up until recently my preferred method was to use a Multi-Dim map and specify that the ‘dimension’ to check was AMOUNT so something like this:

#MULTIDIM ACCOUNT=[228*] AND AMOUNT >= 0

This works really well. The main drawback is that you can’t edit this through the workspace because it does not recognise AMOUNT as a dimension – the dimension selection box is blank. This means you have to manage the maps outside FDMEE. I have always strongly advised my clients to maintain their maps outside FDMEE anyway but it would be better if the maps could be edited either way.

Method overview

This new method involves creating a Lookup Dimension and updating it with text that identifies if the amount is positive or negative. First of all I will go through a high-level overview of the steps; the detail of how to do it follows:

  • Add a Lookup Dimension to the Target Application.
  • Add a Field against the Lookup Dimension on the Import Format. You specify any data – it doesn’t matter. If you don’t do this step you cannot use the Lookup Dimension in Multi-Dim maps.
  • Write an Event script to populate the Lookup Dimension with some appropriate text to identify whether the amount is positive or negative.

Add the Lookup Dimension

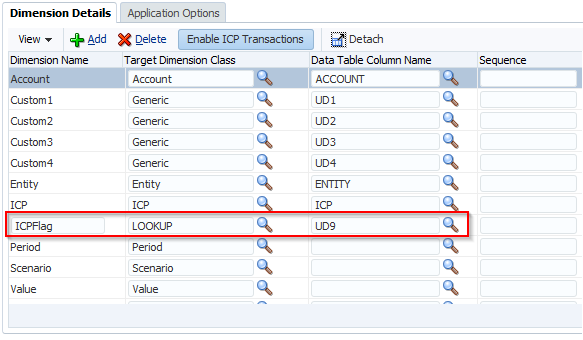
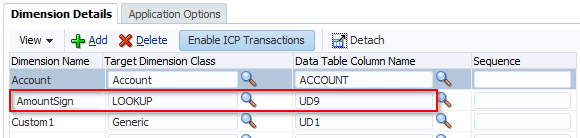
From the Setup tab select Register | Target Application. Then select the Target Application from the Target Application Summary area. Click Add and fill in the boxes. I have called my Lookup Dimension AmountSign and assigned it to UD9 (remember this – we will need it later):

LD2-TargetApplSetup

Update the Import Format

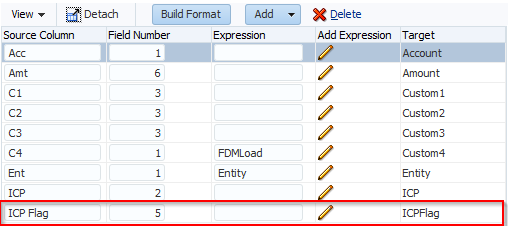
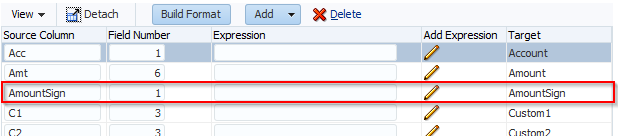
The Import Format will contain the new Lookup Dimension but it won’t have a Field assigned to it. I have assigned the Field Number 1 but it could be anything:

LD2-ImportFormat

Event Script

Now for the bit that does the actual work. Once the data has been imported, the Event script will execute a SQL command to update the value of the AmountSign Lookup Dimension dependent upon whether the data amount is positive or negative. Notice the script needs to reference the Data Table Column Name from earlier (UD9):

# Lookup Dimension
LOOKUP_DIM = 'UD9'
# Text for a Positive number
POSITIVE_NUMBER = '+'
# Text for a Negative number
NEGATIVE_NUMBER = '-'

# SQL to update the LookUp Dimension value
SQL_TEMPLATE = """UPDATE TDATASEG_T SET %s = '%s' WHERE LOADID = ? """
# AND clause for the positive amount.
SQL_AND = """AND AMOUNT > 0"""

# Put the load id into the parameter list
lstParams = [fdmContext["LOADID"]]

# First the Negative - set everything to negative.
SQL = SQL_TEMPLATE % (LOOKUP_DIM, NEGATIVE_NUMBER)
fdmAPI.executeDML(SQL, lstParams, True)

# Now the positive so add the AND clause.
SQL = SQL_TEMPLATE % (LOOKUP_DIM, POSITIVE_NUMBER) + SQL_AND
fdmAPI.executeDML(SQL, lstParams, True)

The Event Script I selected is AftImport but there are others you can choose. Look in the Admin Guide or see here for more information on what Event Scripts are available. You will obviously want a script that is executed before the maps are processed. You will also want to add error handling and more comments.

Notice that the script first sets all records to be the negative value and then updates the records with a positive value – this is slightly quicker in terms of execution. I have deliberately put all the processing into this one script. I could have added the negative value to the Expression column on the Import Format but this would mean that if you wanted to change the positive and negative text (e.g. to P and N) you would have to go to two places to make the changes. This way everything that is needed for the AmountSign dimension is in this one script.

Import the data

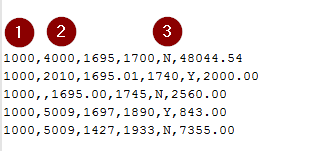
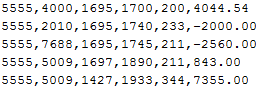
This is our source data (Account, ICP, Custom1, Custom2, Custom3, Amount):

LD2-DataSource

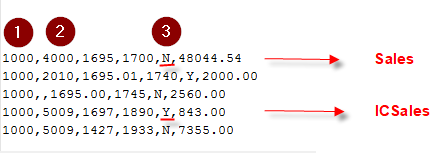
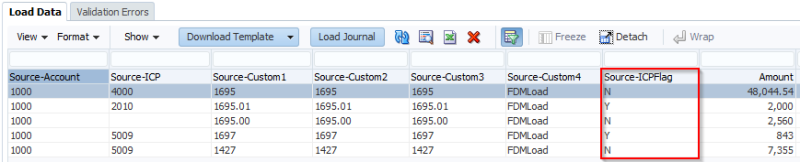
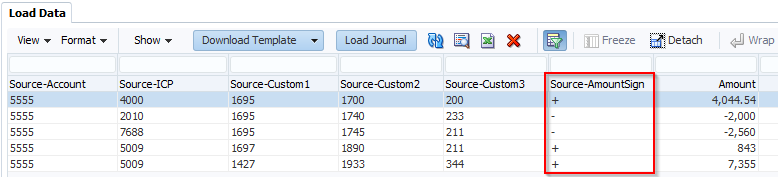
And this is how it looks after the import with the AmountSign dimension. You can see that you now have a piece of text that you can use in maps:

LD2-DataImported

Multi-Dim maps

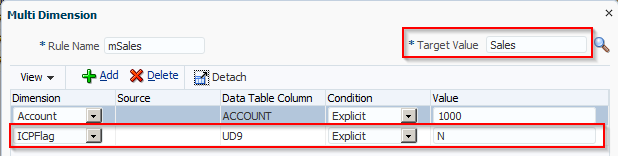
Now I can create a Multi-Dim map that references the AmountSign dimension:

LD2-Map

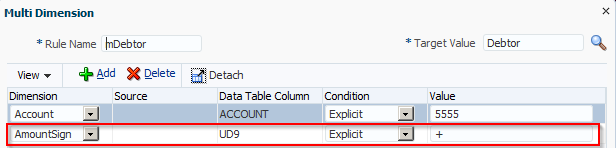
This means that the users can now map by the data amount without any scripting or editing of the labels or logic accounts. And the map is contained in the Export All Dimensions.

Taking it one step further…

There are certain types of account that needs to be accumulated before they can be mapped for example VAT. Logic Accounts are usually used to aggregate source data but they have their own set of problems (difficult to trace back to the ledger, need to ignore the source records, auditors don’t like them…). SQL commands can be used to aggregate data. That means that if there is a requirement to aggregate data before applying the map we might be able to do it in an Event script.

Add a Lookup Dimension (I will call it AmountAccumSign and assign it to UD8) and add it to an Import Format as before. Change the Event Script to this (the new lines have _ACCUM):

# LookUp Dimension
LOOKUP_DIM = 'UD9'
# Lookup dimension for the accumulated amount
LOOKUP_DIM_ACCUM = 'UD8'

# Text for a Positive number
POSITIVE_NUMBER = '+'
# Text for a Negative number
NEGATIVE_NUMBER = '-'

# SQL to update the LookUp Dimension value
SQL_TEMPLATE = """UPDATE TDATASEG_T SET %s = '%s' WHERE LOADID = ? """
# AND clause for the positive amount.
SQL_AND = """AND AMOUNT > 0"""
# SQL for the accumulated amount - positive.
SQL_TEMPLATE_ACCUM = """UPDATE TDATASEG_T SET %s = '%s'
     WHERE LOADID = ? AND (ACCOUNT IN
     (SELECT ACCOUNT
      FROM TDATASEG_T
      GROUP BY LOADID, ACCOUNT
      HAVING LOADID = ? AND SUM(AMOUNT) > 0))"""

# Put the load id into the parameter list
lstParams = [fdmContext["LOADID"]]

# First the Negative - set everything to negative.
SQL = SQL_TEMPLATE % (LOOKUP_DIM, NEGATIVE_NUMBER)
fdmAPI.executeDML(SQL, lstParams, True)

# Now the positive so add the AND clause.
SQL = SQL_TEMPLATE % (LOOKUP_DIM, POSITIVE_NUMBER) + SQL_AND
fdmAPI.executeDML(SQL, lstParams, True)

# Set all the accumulated values to negative
SQL = SQL_TEMPLATE % (LOOKUP_DIM_ACCUM, NEGATIVE_NUMBER)
fdmAPI.executeDML(SQL, lstParams, True)

# Clear out the parameter list because it needs to have the loadid twice
lstParams = []
lstParams = [fdmContext["LOADID"], fdmContext["LOADID"]]

# Update the records to positive where the accumulated amount > zero.
SQL = SQL_TEMPLATE_ACCUM % (LOOKUP_DIM_ACCUM, POSITIVE_NUMBER)
fdmAPI.executeDML(SQL, lstParams, True)

Import the same data and include some test data and this is what you get. I am showing it in Excel format so that it’s easy to show the subtotals by Account:

LD2-DataImported-2

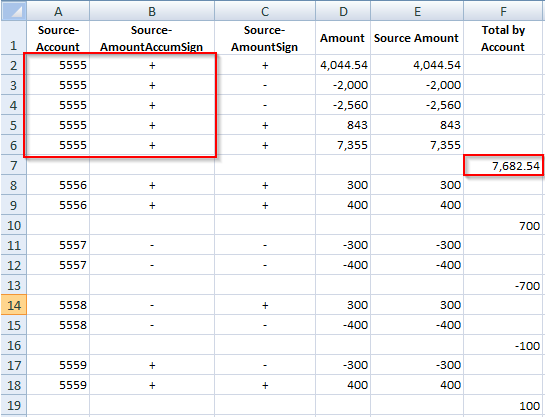
This works well if you are wanting to accumulate the source data by the same dimensions for all the source rows (e.g. Account and Custom1). If you want to accumulate some data by Account and Custom1 and others by Account and Custom2, then this probably won’t work for you and it’s better to stick to Logic Accounts.

NOTE: I have tested this on SQL Server and I can’t see anything that would stop it working on Oracle but I might be wrong.

Conclusion

Using Lookup Dimensions to hold the result of a SQL command works really well and for the most part is transparent to the users. They just see the result as added information. The flexibility of being able to map by data amount (and perhaps accumulated data amount as well) with little impact on the system while keeping it all in standard map format is a big win in my opinion. You can use the same principle for other requirements such as wanting to use <BLANK> in a Multi-Dim map – create a Lookup Dimension and update it to BLANK where the relevant field is empty.

Lookup Dimensions in FDMEE

In this post I will be looking at Lookup Dimensions. There are many references to Lookup Dimensions on the web but I haven’t found anything that really explains what they are, how to use them or why you would want to use them. In this article I will walk through an example of when you might consider using a Lookup Dimension and why.

First of all this is what the manual says:

Lookup dimensions are used for mapping and reference. They can only be used in FDMEE and do not affect the dimensionality of a target application. They can also be used with member mapping functionality to cross-reference multiple source segments and chartfields and assign a target value.

This is not really telling us much about Lookup Dimensions. If you already know what a Lookup Dimension is, then it makes sense. If you don’t, it doesn’t. Let’s start at the same place that most FDMEE engagements do: the ledger extract file.

LD1-SourceFile

The column marked with 1 contains the Account dimension, the column marked with 2 is the ICP and the column marked with 3 is the intercompany flag (ICP Flag) that identifies if an account is intercompany or not. The source account (1000) needs to be mapped to the account Sales if it’s external and ICSales if it’s internal (i.e. intercompany).

Your first idea might be a Multi-Dim map that checks the ICP member for Account 1000. The problem is that the ledger has no validation on the ICP dimension if the value in ICP Flag is N. Lines 4 and 5 in the sample have the same ICP member but the ICP Flag is different. You need to reference the ICP Flag information but that is currently not on the Import Format.

LD1-SourceFile-2

The standard approach would be to concatenate the Account dimension and ICP Flag. This means the Account map is 1000-Y maps to ICSales and 1000-N maps to Sales. That will work but it means that the maps for all the other accounts will have to be adjusted to take account of the ‘-N’.

You might consider writing an Import Script that modifies the Account or ICP member based on the value in the ICP Flag column. Maybe something like changing the ICP Member to NONE if the ICP Flag is N. This method will work but it’s not easy to implement and you are manipulating the ledger data which is never a good idea. The simple answer of course is to use a Lookup Dimension.

We will create a Lookup Dimension to hold the value of this ICP Flag field and then use Multi-Dim maps for the Account 1000 that reference the Lookup Dimension. It means that the other Account maps are unaffected, there is no messy scripting and it is simple to understand and implement.

To create a Lookup Dimension go to the Setup tab then Register | Target Application. Select the Target Application and click Add. The Target Dimension Class defaults to LOOKUP. Fill in the Dimension Name (in this case ICPFlag) and the Data Table Column Name. I have chosen UD9 (UD stands for User Defined) but you can select any of the unused columns (there are 20 in total). The order of these UD columns (i.e. the Custom dimensions and Lookup Dimensions) varies; in most places they are sorted by the Dimension Name but in a few places they are sorted by the Data Table Column Name. This means that the order is UD1, UD10, UD11…UD19, UD2, UD20, UD3 etc. I use UD9 to make sure this Lookup Dimension does not appear in the middle of the Custom Dimensions.

LD1-TargetApplSetup

You now have a dimension in your Target Application called ICPFlag. This dimension appears everywhere that a standard dimension does so it is on the Import Format, in the workbench, in the Maps etc. You choose what parts you are going to use. We are going to use the ICPFlag dimension in Multi-Dim maps so we need to update the ICPFlag field on the Import Format:

LD1-ImportFormat

NOTE: Lookup Dimensions are automatically added to the list of dimensions available on the Import Format but they do not have a Field assigned. If you do not assign a Field to the Lookup Dimension on the Import Format for the Data Load Rule on your Point of View, the Lookup Dimension does not appear as a Dimension in Multi-Dim maps. There are times when you want to use a Lookup Dimension for data that is not in the source but you still have to give it a source field.

Import the source data:

LD1-WorkBench

With the Lookup Dimension updated on the Import Format we can add a Multi-Dim map:

LD1-MDMap

The map references the ICP Flag dimension just for the Account 1000. The other Account maps are unaffected and there are no scripts. A Lookup Dimension fits here because the ICP Flag data is not needed in the Target Application and it is only relevant for a small subset of the Account dimension.


Migrating FDM maps to FDMEE

** UPDATED SEE BELOW **

The recommended way of migrating FDM to FDMEE is to use the migration utility. This utility is a quick way of creating your complete (almost) FDM application in FDMEE. It works at a database level so there are no options to specify what you want to migrate. Once the FDMEE application is created the migration utility isn’t used again. The migration utility is used when you are not making any changes to the application, it’s simply a software upgrade. It does have limitations and doesn’t work for everyone but it’s a good option for a lot of people.

It’s more of a challenge keeping FDM in step with FDMEE once the application has been created. FDM is the production system while FDMEE is the new development. FDM will probably continue to change. The main changes are going to be in the maps so you need a quick and reliable way of comparing and transferring the maps from FDM to FDMEE. Your first thought is probably to export the FDM maps to Excel because you can also do that in FDMEE and then you can compare the two outputs somehow. But you will have to do the export for each dimension in every location. And you will have to manipulate the output maybe even save it as a CSV if you want to compare with FDMEE.

There is a much quicker way of exporting the maps. FDM comes with scripts which are executed from the workbench client that export the maps for one or all dimensions:

migratemaps-wbc

The downside is that these scripts do not export enough information that can be used as an import for FDMEE and IN type maps are not included. So the answer is to write your own script to export the maps in a format that FDMEE can use.

I am not going to go through the details of how to write a custom script for FDM (internet search – filetype:pdf “fdm” “scripting guide”) but I will go through the high-level design. If you are still not sure then contact your consulting partner (or even better me 🙂 ).

Firstly you want to get a recordset of all the locations which do not have a parent and are data load type (PARTCONTROLSTYPE = 1). Then you want to query the maps table for each location and write the data to a separate file for each location. The hardest part of the script is actually the SQL for reading the maps because it needs to put the maps in FDMEE format. So here is the SQL (I have tested this on SQL Server. You will need to change + to || for Oracle.):

SELECT DISTINCT UPPER(DimName) AS DimName,
CASE
WHEN MAP.WHERECLAUSETYPE = 'BETWEEN' THEN REPLACE(MAP.WHERECLAUSEVALUE, ',', '>')
WHEN MAP.WHERECLAUSETYPE = 'LIKE' THEN MAP.WHERECLAUSEVALUE
WHEN MAP.WHERECLAUSETYPE = 'IN' THEN MAP.WHERECLAUSEVALUE
ELSE MAP.SRCKEY
END AS SRCKEY,
CASE
MAP.DIMNAME WHEN 'ACCOUNT' THEN CASE MAP.CHANGESIGN WHEN 1 THEN '-' + MAP.TARGKEY ELSE MAP.TARGKEY END
ELSE MAP.TARGKEY
END AS TARGKEY,
CASE
WHEN MAP.WHERECLAUSETYPE = 'BETWEEN' THEN MAP.SRCKEY
WHEN MAP.WHERECLAUSETYPE = 'LIKE' THEN MAP.SRCKEY
WHEN MAP.WHERECLAUSETYPE = 'IN' THEN MAP.SRCKEY
ELSE NULL
END AS NAME,
SRCDESC
FROM TDATAMAP AS MAP
WHERE (PARTITIONKEY = @LOCKEY@)
ORDER BY DIMNAME, SRCKEY

You then update the string @LOCKEY@ with the location key for each location. You can read through the columns in the recordset with a For loop:

For nFieldCounter = 0 To rsMap.Fields.Count - 1
' Get the next value
strFieldValue = rsMap.Fields(nFieldCounter).Value
....
Next  

Don’t forget that you will need an extra field in the export file for the Data Load Rule.

This script will create text files that can be directly imported into FDMEE. With a matching script for FDMEE (see FDMEEtoolbox), you now have a quick and robust method for exporting all the maps from FDM and FDMEE in the same format. If you use something like UltraCompare or BeyondCompare, you can easily check the differences between the two sets of files.


Update

A client of mine pointed out a difference between FDM and FDMEE that I was not aware of. The Change Sign setting controls whether or not to multiply the data amount by -1. This is applied to the Account dimension only. So that’s standard FDM/FDMEE mapping. You can accidentally apply the Change Sign setting to other dimensions if you manage the maps in Excel or a text file. This is where the difference between FDM and FDMEE comes in. FDM ignores the Change Sign setting in the other dimensions; FDMEE doesn’t. If you have, for example, flagged a Custom map as Change Sign, it will be used. You have to export the maps and check them externally because the Change Sign setting only appears for the Account dimension in the workspace. This is the case in 11.1.2.4.200 – I haven’t had a chance to check 210 yet.

I have updated the SQL statement so that the Change Sign setting is only applied to the Account dimension.

Managing maps in FDMEE (or how brilliant are Multi-Dim maps)

In this blog I want to look at how to manage FDMEE maps. By that I mean a reliable and repeatable process for importing and exporting that is simple for the users and covers all the different maps. The process must take an export from FDMEE and create an import file in the correct format. Currently in FDMEE you can’t do this – there are problems with scripts, Data Load Rules, what is exported and what can be imported.

From an FDM point of view, it is very common to manage maps in Excel. It gives you a backup of the maps outside FDM and allows the maps to be reviewed, signed off and audited with a minimum of fuss and training. Using Excel for FDMEE maps is not the same. In FDM there were scripts to extract all the maps by location which could be scheduled to run once a month. This gives you a backup and an audit of the maps. You can do the same in FDMEE but it is a little more difficult because you have to write the scripts from scratch. In FDM you can import the maps through the Excel interface. You can do the same in FDMEE but it does not import all the map information and some of the data is not supported.

Scripts
The FDMEE Admin guide refers to scripts in maps as Conditional Mapping. These are the scripts that you write in Jython or SQL not the Multi-Dimensional maps. Exporting and importing these Jython/SQL scripts is problematic. In FDM, scripts in maps can be exported and imported through the Excel interface. That’s FDM, what about FDMEE? The Admin Guide says: “FDMEE does not support #SQL and #SCRIPT for Excel mappings”. OK so that just about kills that one dead then. The FDMEE Excel template is set up to include the VBScript column in the upload named range (and yes it is called VBScript even though the language is Jython/SQL). I have used the template for importing Conditional maps and it works. The problem is that the Admin guide says that it’s not supported. So is it that there is a problem with importing these scripts that I haven’t come across yet or have I strayed into a “consultants only” area? I don’t know but I am certain of one thing: if the manual says don’t do it then you need to have a very good reason for ignoring that.

Here is an overview of the functionality for exporting and importing:

FDMEE-Export

Export – Excel

• Scripts are not exported from Data Load Mapping. The #SCRIPT/#SQL header record is exported but the actual script that is executed is not.
• In 11.1.2.4 all map information can be exported through the Excel Interface. In 11.1.2.3 you have to write a custom script to export all the map information or use LCM.
• Current dimension only.
• I have found that the Export to Excel sometimes produces a file with just the column headings.

Export – Text (Current Dimension and All Dimensions)

• Scripts are not exported from Data Load Mapping. The #SCRIPT/#SQL header record is exported but the actual script that is executed is not.
• Current dimension or All dimensions can be exported.

FDMEE-Import
Import – Excel

• Importing scripts in maps (#SCRIPT/#SQL) through the Excel interface is not supported. Possible (?) just not supported.
• You can use LCM but that contains maps for the whole application and not just the maps for a single location.
• You cannot use the Excel Interface in 11.1.2.4 to import maps – it does not increment the DataKey column correctly and it will corrupt the maps.
• You can write a custom script that reads a text file and imports these Conditional maps.

Import – Text (Current Dimension and All Dimensions)

• Importing scripts in maps (#SCRIPT/#SQL) through text files is not possible.

In summary, exporting and importing scripts in maps is difficult. I keep scripts in maps down to absolute minimum. I always have an external backup of the scripts because I use Notepad++ not the internal editor.

Data Load Rules
A map can be restricted to a Data Load Rule and this information can be exported and imported. The problem here is in the Excel interface because it uses the Data Rule Name id not the name. The default Excel template that can be downloaded from FDMEE does not include the Data Rule Name column in the named range. You can change the named range to include the column but you must make sure you use the id not the name.

Suggested strategy
Above all, we want a reliable method of exporting and importing all the relevant map information. That means it must be text format – the Excel route is one dimension at a time for export, does not always work and the Data Load Rule is tricky. There are two problems we need to overcome: Scripts and Data Load Rules. If we use text format the Data Load Rule problem is fixed; you can just add the name of the Data Load Rule. That leaves the maps with scripts and a simple way of getting around this problem is not to use them. It’s not enough to say ‘don’t use them’ because there are times when you don’t have a choice. So we will look at a great alternative to scripts in maps: Multi-Dimensional maps.

Multi-Dimensional maps
Scripts in maps are used to do what is not possible in standard maps such as check the target values in other dimensions or map based on the data amount. We know we can use Multi-Dimensional maps to reference the source values in other dimensions. What the manual does not tell you is that with Multi-Dimensional maps you can reference target dimensions, the amount, specify ‘not’ conditions etc. The workspace won’t let you do any of this but the text file will. NOTE: this has been tested on a SQL Server database; things might be different on Oracle.

Here is an example of a multi-dimensional map in a text file:
UD2,#MULTIDIM UD1=[OtherInterest],INTOTH,mINTOTH,,

This is saying if the source Custom1 member is OtherInterest, then map Custom2 to INTOTH. The rule name is mINTOTH. You can reference the Target dimension by adding X to the end of the dimension name. So if I change UD1 to UD1X it will look at the Target Custom1 member:
UD2,#MULTIDIM UD1X=[OTHINT],INTOTH,mINTOTH,,

That means if the Target Custom1 member is OTHINT, then map to INTOTH. You can’t edit these maps in the workspace – they have to be managed in the text files.

You can also reference the data amount by using the AMOUNT or AMOUNTX column so, as an example, map to one account if it’s a credit and another if it’s a debit. The Multi-Dim map only works if there is an equals sign (=) so if you want to map based on amounts you must use <= or >=:

UD2,#MULTIDIM AMOUNT >=[0],POSITIVE,mTEST_P,,
UD2,#MULTIDIM AMOUNT <=[0],NEGATIVE,mTEST_N,,

AmountMap

There have been many occasions when it would have saved a lot of time and mapping if I could just have said if the source does NOT begin with 8 (for example) then map here. Well you can do that too using Multi-Dims. Again the key here is that the Multi-Dim part in the text file must contain an equals sign so we use != instead of <>:
UD2,#MULTIDIM Account !=[1100],OHDETOTH,MOHDIRECT,,

So if the Account is not equal to 1100, then map the Custom2 member to OHDETOTH. And this is how it looks in the workspace:
MD-NotMap

On the downside though there is a laughable bug in Multi-Dim maps. I say laughable because when I first saw it I thought it was funny. It’s not so funny when you try and find a way around it however. I have only tested this on 11.1.2.3 so it might be fixed in 11.1.2.4. Anyway, the bug is if the source value contains OR in capitals, then FDMEE thinks it is a keyword. So CORE becomes C”OR”E:
MD-Core
MD-Core-2
The workaround is to use lower case but if your database is Oracle, then you will probably need to think of something else.

Conclusion
Using Multi-Dimensional maps is a great alternative to Jython or SQL scripts. It means that you can have a safe and reliable way of importing and exporting maps. There are some things Multi-Dim maps can’t do but they have greatly reduced the need for scripts. Now use Excel as a front end to these text files (import and export) and you have a robust and easy to use way of managing and backing up the maps.

Mapping based on the data amount

Mapping based on the data amount is a common requirement for FDM. As an example, if the amount is positive it should be mapped to the debtor account, if it’s negative it should be mapped to the creditor account. I have done this in a number of different ways depending on the requirements and this is listing the different methods I have used. I am not suggesting this is an exhaustive list; I am sure there are other ways of doing it.

This is just an overview that is meant to give you some ideas on how to approach mapping by amount. The scripts illustrate the point I am trying to make; you will need to edit and add to them to get them to work for your own application.

I will be covering four different ways of doing this:

Description… Advantages… Disadvantages… Applies to…
  1. Conditional mapping
Write a script against the map
  • Standard method
  • Keeps audit trail
  • Not easily understood by users
  • Slow
  • ‘Show conversion rules’ can be misleading
  • Target map not validated
 Individual records
  1. Logic account
Create a logic account based on the record value
  • Users do not have to write the VBScript for conditional mapping
  • Slow
  • Audit trail lost
  • Must set source records to ‘Ignore’
  • Can be difficult to maintain
 Accumulated records
  1. Import script
Edit the account label as the record is imported
  • Quick
  • No need for scripting in maps or logic groups
  • Scripting knowledge needed
  • Audit trail lost
  • Might get complicated if it is not easy to identify the relevant accounts
 Individual records
  1. Event script
Apply the maps for the negative records after the map process has completed
  • Keeps audit trail
  • Quick
  • Specialist scripting
  • Might need to maintain a separate set of maps
  • ‘Show conversion rules’ can be misleading
 Individual and Accumulated records

‘Audit trail lost’

This means that the metadata has been changed in some way and is now not the same as the source records in the ledgers. While this might be acceptable for Management applications, it will probably be flagged as an issue for Statutory. It also means that, if you are using ERPi in conjunction with FDM, you cannot drill back to the source ledger.

Data

In the following examples there are two data records each with two fields. The first field is the Account (1100) which is the same for both records. The second field is the data amount. One record has an amount of 1,000 and the other -5,000.

InputData

Positive values should be mapped to account P1000; negative values to account N1000.

Conditional mapping

Conditional mapping is where you add a script to a mapping record. This means that you can control when a map is or is not applied. FDM processes the data one record at a time and holds the information for each record in an array called varValues. (Search the FDM Admin manual for varValues for more information). The data amount is held in varValues(9) so you can write a script that will map based on the value in this field:

Dim DataAmount
DataAmount = varValues(9)
If CDbl(DataAmount) > CDbl(0) Then
    Result = “P1000”
Else
    Result = “N1000”
End If
Notice both amounts are converted to a double (CDbl). In the later versions of FDM you get a type conversion error if you don’t use the CDbl function.

ConditionalMap
If you use the ‘Show Conversion Rules’ feature (or Drill Up), FDM will always show in the Target column the first return value in the script regardless of what is actually applied (ie it is always P1000 even when you drill into the N1000 record):
drillup
You need to go to the Validate step to see the two records mapped to separate targets:
Validate

  • Simplest method.
  • There is no idea of ‘skipping’ the record but you do not need to have an Else clause.
  • This method looks at individual data records.
  • Scripts cannot be applied to Explicit maps.

Logic Account

You can create a logic account that will only create a record if certain conditions are met. In this case the condition will be that the data amount is positive or negative. This is an example using a Simple Logic Group but the principle is the same for Complex:
LogicAccount
The important difference between Logic Accounts and conditional mapping is that conditional mapping is applied to an individual source data record as it is being imported; Logic Accounts are applied after the data has been imported and records with the same metadata attributes are accumulated.

If CurVal > 0 Then
    Result = CurVal
Else
    Result = “Skip”
End If
CurVal is the result of the query. This logic account is only created if the value is greater than zero.

FDM looks at the accumulated values for the specified criteria (CurVal). In this case we have just specified that the source account is 1100. FDM will therefore look at the sum of the two source records (1,000 and -5,000) to get the amount of -4,000 and this is the value that is used for the creation of the logic account.
ImportAfterLogic

  • More advanced method but still using FDM’s built-in functionality.
  • If the metadata attributes of the source record are the same and you still want to map to different targets based on the data amount, you cannot use Logic Accounts because all the records with the same metadata attributes are combined. The values are accumulated and then the logic accounts are applied so in our example we only have one record with an amount of -4000,
  • You might need to create ‘Ignore’ mappings for the source records.
  • The record that is being loaded into the target system has been generated from the source records. It will not exist in the source ledger. It is not easy to track which records have been used to create the logic account.

Import script

You can create an import script that is applied to the Account dimension. The script looks at the data amount for the record and then updates the Account label so that records with positive data amounts can be distinguished from those with negative amounts. For example, the script might add ‘P_’ to the beginning of the Account if the data value is positive and ‘N_’ it is negative.

  1. Create an Import script (DataPump). In this example the import script is called CheckAccount (and there are other ways to achieve this):
Function CheckAccount(strField, strRecord)
Dim dblDataAmount

‘Parse out the data amount from the input record
dblDataAmount = DW.Utilities.fParseString(strRecord, 2, 2, “,”)

‘If the data value is positive add P_ to the beginning of the
‘account label otherwise add N_

If CDbl(dblDataAmount) > 0 Then
    CheckAccount = “P_” & strField
Else
    CheckAccount = “N_” & strField
End If

End Function

The script parses out the data amount from the source record and stores it in the variable dblDataAmount.


The script must set a value to the function CheckAccount. The script is applied to the account field so the parameter strField contains the account label. The script then adds either P_ or N_ to the account label depending on the data value.

  1. Apply the script to the import format.
  2. importScript

  3. The script updates the source account label:
  4. importScript2

  5. Create standard maps to convert P_1100 to P1000 and N_1100 to N1000.
  • Simple scripting solution.
  • The script works on individual records.
  • You might want to restrict the script to execute only for certain accounts. You will need to have a method for identifying these accounts.
  • You might need specialist scripting help.
  • The account label has been modified by the import script and will not exist in the source ledger.

Event script

An Event script is a script that is executed in response to an event in FDM. By default Event scripts are empty and when you create an Event script it will be executed automatically by FDM when appropriate.

After the data has been imported into FDM, the logic group is executed and then the maps are applied. The script for updating the maps based on data value will execute after the maps have been applied and, in essence, will apply a second set of maps. This is done by executing a SQL statement directly on the FDM database. Before we look at the script we need to understand how FDM stores its mapping data.

Mapping table

The maps for all locations are held in the table tDataMap. If you use the ‘Export to Excel’ function for the maps this should look familiar. Take note of the DataKey field in the screenshot below. Also notice there is a second map for the source account 1100 which has a suffix of ‘NEG’:
DataMap1

Data table

There are 50 data tables in an FDM application by default. When a location is created it is assigned one of these 50 tables to store its data; this is called the ‘segment’. If you have 300 locations in an application, you will have roughly six locations sharing a segment. In order to retrieve the data from the database for a location, you need to know the location’s segment number. This will then give you the name of the table for the data segment eg tDataSeg4 or tDataSeg23.

Here is an example of the data segment table. Two records have been imported. Looking at the Account dimension, the source account label is held in the column ‘Account’ (1), the target account label is held in the column ‘AccountX’ (2) and the DataKey value from the mapping table is held in the column ‘AccountR’ (3):
DataSeg2
The Event script will update the data segment table so that the AccountX column holds the updated target account label and the AccountR column will hold the datakey value for this new map record. The information for the AccountX and AccountR columns is held in the 1100NEG map record.

The script – When to execute

The key to Event scripts is understanding when to execute them. Event scripts are documented in the FDM API Object Guide. The script can be executed at a number of different places; the main requirement is that the default mapping process must have finished when the event script is executed. In this example we will use the Event ImportProcess. This event has one parameter: strEventName. You will want to execute the script only for the event name ‘EndProcess’.

The script – What to execute

In order to map the negative data records to a different target, you need to update the AccountX and the AccountR values when the Amount value is less than zero. You only want to do this for the current location, category and period.
DataSeg4

The first step is to write and test the SQL statement that will update the record without worrying about data segments, locations, categories etc.

UPDATE tDataSeg4SET AccountX = ‘N1000’, AccountR =
  (SELECT DataKey FROM tDataMap
  WHERE SrcKey = ‘1100NEG’
  AND DimName = ‘Account’
  AND PartitionKey = 751)
WHERE AccountX = ‘P1000’
AND CatKey = 13
AND PartitionKey = 751
AND PeriodKey = ‘1/31/2012’
AND Amount < 0
This will update the record so that the account is mapped to N1000 and the correct DataKey value is stored for records where the Amount is negative.

Once you have tested that the SQL syntax is correct, you need to look at updating the script with correct segment id, category id etc.

Update the script with the correct ids

Segment id RES.PlngSegKey
Partition key RES.PlngLocKey If the location uses a parent location for its maps, the Partition key will need changing.
Category key RES.PlngCatKey
Period key RES.PdtePerKey The period key might need some manipulation depending on the date format.
  • The example is written for SQL Server. Oracle is case sensitive so DimName = ‘Account’ will need reviewing (LIKE ‘A%’).
  • The example updates individual records. You can use the SUM function on the Amount field to apply the update to the accumulated value. You will also need to use a GROUP BY clause.

Completed script

The ImportAction script will look similar to this:

Sub ImportAction(strEventName)
If strEventName = “EndProcess” Then

    ‘Get the name of the DataSeg table. This holds the data for the location.
    strSegTable = “tDataSeg” & RES.PlngSegKey

    ‘Set up the Update SQL query. This will update the tDataSeg table with
    ‘the new target member and add the mapping record number for this new member
    strSQL = “UPDATE ” & strSegTable & ” SET AccountX = ‘N1000’, AccountR = ”
    strSQL = strSQL & “(SELECT DataKey FROM tDataMap ”
    strSQL = strSQL & “WHERE SrcKey = ‘1100NEG’ ”
    strSQL = strSQL & “AND DimName = ‘Account’ ”
    strSQL = strSQL & “AND PartitionKey = ” & RES.PlngLocKey & “) ”

    strWhere = “WHERE AccountX = ‘P1000’ ”
    strWhere = strWhere & “AND CatKey = ” & RES.PlngCatKey & ” ”
    strWhere = strWhere & “AND PartitionKey = ” & RES.PlngLocKey & ” ”
    strWhere = strWhere & “AND PeriodKey = ‘” & Month(RES.PdtePerKey) & “/” & Day(RES.PdtePerKey) & “/” & Year(RES.PdtePerKey) & “‘ ”

    ‘Put the SQL statements together and add the check for the Amount being negative.
    ‘This will process individual records.
    strUpdate = strSQL & strWhere & “AND Amount < 0 ”

    blnReturn = DW.DataManipulation.fExecuteDML(strUpdate, RES.FDMFalse, RES.FDMTrue)

End If

End Sub

  • Complex scripting solution. You might need specialist scripting help.
  • The script works on individual or accumulated records.
  • You will want to restrict the script to execute only for certain accounts. You will need to have a method for identifying those accounts.
  • The account label has not been modified by the script so drill back to the source ledger will still work.

Creating an Excel spreadsheet from FDM without loading Excel

I have written many scripts for FDM that generate files which are ultimately destined for Excel. I know how to create Excel spreadsheets through a script but you don’t want to run scripts that call Excel on a server. Excel needs to be installed for one thing and secondly you run the risk of slowing everything down because there are so many instances of Excel running. So I looked at different ways of creating an Excel spreadsheet and I decided that ADO (Active Data Objects) was probably the simplest method.

The idea behind this is to allow you to create a backup of your maps for all dimensions in a single file. You will have a separate file per location and period. Each file can then be loaded back into FDM.

There are two parts to this: the Script and the template spreadsheet. The script takes a copy of the template spreadsheet and uses it as a source for an ADO recordset. The template spreadsheet has the header information for the maps which is used by the script to populate the correct columns. The script then queries FDM to get the maps for the current location and adds them to the spreadsheet. ADO does not allow any control over the spreadsheet and I wanted the name range to be automatically updated. So there is a macro in the spreadsheet that runs whenever you open the spreadsheet. The macro reads through all the sheets and will create a name range for any maps it finds.

The script follows. Copy this to a file called webExportMapsToExcel.uss and save it in the folder Data\Scripts\Custom.

Option Explicit

Sub webExportMapsToExcel()
'------------------------------------------------------------------
'Oracle Hyperion FDM CUSTOM Script:
'
'Created By: Marcus Hemy. Marcus@HandL.me.uk
'Date Created: November 2013
'
'Purpose: Create an Excel spreadsheet with the maps for the current location without loading Excel.
'
'Dependencies: The script needs a starting Excel spreadsheet.
'
'------------------------------------------------------------------
Dim objFSO
Dim strFileTemplate
Dim strFileExtension
Dim strFileCreated
Dim strConnection, conn, strSQL
Dim field
Dim strDoubleQuote
Dim rs, rsMap
Dim sDimensionList, sDimension
Dim arrDimensions
Dim strLoc
Dim strPer
Dim strMessage
Dim strScriptName
Dim strSourceFolder
Dim strTargetFolder

strScriptName = "webExportMapsToExcel"

 'Check Excel Template file exists in the Templates folder.
 'Get the Outbox folder
 strSourceFolder = DW.Connection.PstrDirOutbox
 'Add a backslash if it needs one
 If Right(strSourceFolder, 1) <> "\" Then strSourceFolder = strSourceFolder & "\"
 'Add the Templates folder
 strSourceFolder = strSourceFolder & "Templates\"

 'Set the folder where the file will be created to the Inbox.
 strTargetFolder = DW.Connection.PstrDirInbox
 If Right(strTargetFolder, 1) <> "\" Then strTargetFolder = strTargetFolder & "\"
 'Name of the template file.
 strFileTemplate = "MapTemplate"
 'File extension. XLS works but XLSM does not.
 strFileExtension = ".XLS"

'Dimension list. Just add another dimension label here.
 sDimensionList = "Account;ICP;Entity;UD1;UD2;UD3;UD4"
 arrDimensions = Split(sDimensionList, ";")

'The output file will have the current location and period added to the file name.
 strLoc = RES.PstrLoc
 'Remove any spaces from the perod
 strPer = Replace(RES.PstrPer, " ", "")

 'Create the file system object
 Set objFSO = CreateObject("Scripting.FileSystemObject")

 'Make sure the template file exists
 If objFSO.FileExists(strSourceFolder & strFileTemplate & strFileExtension) Then

'Make a copy of the Template
     strFileCreated = strTargetFolder & strFileTemplate & "-" & strLoc & "-" & strPer & strFileExtension
     objFSO.CopyFile strSourceFolder & strFileTemplate & strFileExtension, strFileCreated, True

 Else
     strMessage = "Cannot find the source template file: " & strSourceFolder & strFileTemplate & strFileExtension

     If LCase(API.DataWindow.Connection.PstrClientType) = "workbench" Then
         'Win32 Client (Use Msgbox)
         MsgBox strMessage, vbOKOnly, strScriptName
     Else
         'Web Client (Set API action properties)
         RES.PlngActionType = 2 '(See Enumeration: ScriptActionTypes)
         RES.PstrActionValue = strScriptName & vbCrLf & strMessage
     End If
     Exit Sub
 End If

 'Destroy the file system object
 Set objFSO = Nothing

'Need to pass a double quote to a string so save it to a variable
 strDoubleQuote = Chr(34)

 'Set up the connecion string based on the file extension
 Select Case UCase(strFileExtension)
 Case ".XLS"
     strConnection = "Provider=Microsoft.Jet.OLEDB.4.0;Data Source=" & strDoubleQuote & strFileCreated & strDoubleQuote & ";Extended Properties=" & strDoubleQuote & "Excel 8.0;HDR=Yes;" & strDoubleQuote & ";"
 Case ".XLSX", ".XLSM"
     strConnection = "Provider=Microsoft.ACE.OLEDB.12.0;Data Source=" & strDoubleQuote & strFileCreated & strDoubleQuote & ";Extended Properties=" & strDoubleQuote & "Excel 12.0 Xml;HDR=Yes;" & strDoubleQuote & ";"
 End Select

 'Create an ADO connection
 Set conn = CreateObject("ADODB.Connection")

 'Connect ie open the file
 conn.Open strConnection

 'Create a recordset
 Set rs = CreateObject("ADODB.recordset")

 'Specify the cell range where the current header info is.
 strSQL = "SELECT * FROM A1:J2"
 'Now open those cells as a recordset
 rs.Open strSQL, conn, 3, 3

 'Read the maps for each dimension
 For Each sDimension In arrDimensions

     'Get the map records for the Location and Dimension
     Set rsMap = API.SQLMgr.fMapItems(CStr(strLoc), sDimension)

     'Make sure the function returned records
     If Not rsMap.BOF And Not rsMap.EOF Then
         'Now loop through the map records
         Do While Not rsMap.EOF
             'Write a new row to Excel
             rs.AddNew
             'Go through each column. OriginalValue holds the column name.
             For Each field In rs.Fields
                 field.Value = rsMap.Fields(field.OriginalValue).Value
             Next
             rs.Update

             'Get the next map record
             rsMap.MoveNext
         Loop
     End If

     Set rsMap = Nothing
 Next

'Tidy up
 rs.Close
 Set rs = Nothing

conn.Close
 Set conn = Nothing

strMessage = "Maps exported to: " & strFileCreated

If LCase(API.DataWindow.Connection.PstrClientType) = "workbench" Then
     'Win32 Client (Use Msgbox)
     MsgBox strMessage, vbOKOnly, strScriptName
 Else
     'Web Client (Set API action properties)
     RES.PlngActionType = 2 '(See Enumeration: ScriptActionTypes)
     RES.PstrActionValue = strScriptName & vbCrLf & strMessage
 End If

End Sub

For the template, open Excel and in cell A1 add tDataMap. In A2 to J2 add PartitionKey, DimName, SrcKey, SrcDesc, TargKey, ChangeSign, WhereClauseType, WhereClauseValue, Sequence, VBScript

Go to the VBE in Excel (Alt+F11) and add the following code to ThisWorkbook:

Image

Option Explicit

Private Sub Workbook_Open()
Dim sSheet As String
Dim nCounter As Integer
Dim sCurrentLocation As String
Dim sStartCellAddress As String
Dim sEndCellAddress As String
Dim MaxRows As Long
Dim sNamedRange As String
Dim sSourceFileName As String

'ActiveCell.Offset(cMOVEDOWN, cSAMECOLUMN).Select
Const cMOVERIGHT As Integer = 1
Const cMOVELEFT As Integer = -1
Const cMOVEUP As Integer = -1
Const cMOVEDOWN As Integer = 1
Const cSAMEROW As Integer = 0
Const cSAMECOLUMN As Integer = 0

On Error GoTo PROC_ERR

 sSourceFileName = "MAPTEMPLATE.XLS"
 If Right$(UCase$(ActiveWorkbook.Name), Len(sSourceFileName)) = sSourceFileName Then
     'Don't do this for the source file
 Else
     'Go through each sheet
     SaveLocation False
     With ActiveWorkbook.Sheets
         For nCounter = 1 To .Count
             If .Item(nCounter).Type = xlWorksheet Then
                 sSheet = ActiveWorkbook.Sheets(nCounter).Name
                 Application.Sheets(sSheet).Select
                 'Search for tDataMap - produces an error if it doesn't find it
                 On Error Resume Next
                 Cells.Find(What:="tdatamap", After:=ActiveCell, LookIn:=xlFormulas, _
                                 LookAt:=xlPart, SearchOrder:=xlByRows, SearchDirection:=xlNext, _
                                 MatchCase:=False, SearchFormat:=False).Activate
                 On Error GoTo PROC_ERR
                 If UCase$(ActiveCell.Text) = "TDATAMAP" Then
                     'Create the name range
                     sNamedRange = "ups" & sSheet
                     sStartCellAddress = ActiveCell.Address
                     sEndCellAddress = ColLetter(ActiveCell.Offset(cSAMEROW, cMOVERIGHT * 9).Column)
                     MaxRows = Range(sStartCellAddress).CurrentRegion.Rows.Count
                     sEndCellAddress = "$" & sEndCellAddress & "$" & MaxRows
                     ActiveWorkbook.Names.Add Name:=sNamedRange, RefersTo:="='" & sSheet & "'!" & sStartCellAddress & ":" & sEndCellAddress, Visible:=True
                 End If
             End If
         Next
     End With
     SaveLocation True
 End If
PROC_EXIT:
     Exit Sub

PROC_ERR:
     MsgBox "Error: " & Err.Number & " " & Err.Description & vbCrLf & "In procedure Workbook.Open", vbOKOnly + vbCritical, "CreateNameRange"
     Resume PROC_EXIT

End Sub
Private Function ColLetter(ByVal ColNumber As Integer) As String
     ColLetter = Left$(Cells(1, ColNumber).Address(False, False), 1 - (ColNumber > 26))
End Function
Public Sub SaveLocation(ReturnToLoc As Boolean)
Static Wb As Workbook
Static WS As Worksheet
Static R As Range

On Error Resume Next
If ReturnToLoc = False Then
Set Wb = ActiveWorkbook
Set WS = ActiveSheet
Set R = Selection
Else
Wb.Activate
WS.Activate
R.Select
End If

End Sub

Call this file MapTemplate and save it as an XLS. Put it in the Templates folder under the FDM application Outbox.

MapTemplate webExportMapsToExcelUSS